WildFly Bootable JAR Datasource configuration
WildFly Bootable JAR is an efficient packaging format offered by the WildFly application server, enabling the creation of self-contained, executable JAR files for deploying Java EE applications. In this article we will learn how to configure a Datasource connection so that you can use Jakarta Persistence API with it.
Bootable JAR Overview
Firstly, if you are new to WIldFly Bootable JAR we have a quickstart introduction to it that will get you up to speed: Turn your WildFly application in a Bootable JAR
From the quickstart, you should be able to grasp two key concepts of the Bootable JAR architecture:
Feature Pack: A feature pack in WildFly represents a collection of related features, subsystems, and functionalities bundled together for modular deployment. It includes a set of extensions, configurations, and capabilities designed to address specific use cases or requirements. For example, the wildfly-datasources-galleon-pack allows automatic binding of the Datasource subsystem from a set of environment variables or System Properties
Layers: A layer in WildFly represents a logical grouping of feature packs and configurations that define specific aspects of the server’s behavior or characteristics. Layers enable the modular assembly of the server by grouping related functionalities together. For example, the postgresql-datasource allows installing the PostgreSQL Driver and Datasource
Installing a Datasource with Bootable JAR
After our introduction, let’s see how to install a DataSource, for example PostgreSQL Datasource. In order to install it, we need to include the following configuration elements:
wildfly-datasources-galleon-packFeature Packpostgresql-datasourceLayer
Here is a configuration you can add to your WildFly project, to install the Datasource.
<plugin>
	<groupId>org.wildfly.plugins</groupId>
	<artifactId>wildfly-jar-maven-plugin</artifactId>
	<version>10.0.0.Final</version>
	<configuration>
		<feature-packs>
			<feature-pack>
				<location>wildfly@maven(org.jboss.universe:community-universe)#${version.wildfly}</location>
			</feature-pack>
			<feature-pack>
				<groupId>org.wildfly</groupId>
				<artifactId>wildfly-datasources-galleon-pack</artifactId>
				<version>${version.wildfly.datasources.galleon-pack}</version>
			</feature-pack>
		</feature-packs>
		<layers>
			<layer>jaxrs</layer>
			<layer>jpa</layer>
			<layer>postgresql-datasource</layer>
		</layers>
		<excluded-layers>
			<layer>deployment-scanner</layer>
		</excluded-layers>
		<plugin-options>
			<jboss-fork-embedded>${plugin.fork.embedded}</jboss-fork-embedded>
		</plugin-options>
	</configuration>
	<executions>
		<execution>
			<goals>
				<goal>package</goal>
			</goals>
		</execution>
	</executions>
</plugin>
Configuring the DataSource settings
By default, the postgresql-datasource Layer will attempt to install a DataSource with the JNDI name java:jboss/datasources/PostgreSQLDS . Therefore, you need to include this binding in your persistence.xml or equivalent.
<persistence version="3.0" xmlns="https://jakarta.ee/xml/ns/persistence"
             xmlns:xsi="http://www.w3.org/2001/XMLSchema-instance"
             xsi:schemaLocation="https://jakarta.ee/xml/ns/persistence https://jakarta.ee/xml/ns/persistence/persistence_3_0.xsd">
    <persistence-unit name="primary">
        <jta-data-source>java:jboss/datasources/PostgreSQLDS</jta-data-source>
        <properties>
            <!-- Properties for Hibernate -->
            <property name="hibernate.dialect" value="org.hibernate.dialect.PostgreSQLDialect"/>
            <property name="hibernate.hbm2ddl.auto" value="create-drop"/>
            <property name="hibernate.show_sql" value="true"/>
        </properties>
    </persistence-unit>
</persistence>
Then, we need to provide some values for the Database username, password and DB in order to connect to a specific Database instance. You can find here the list of Environment variables or Java System Properties that you can inject into the Datasource: https://github.com/wildfly-extras/wildfly-datasources-galleon-pack/tree/main/doc/postgresql
For example, we will export the following environment variables before starting the Bootable JAR application
export POSTGRESQL_DATABASE=postgresDB
export POSTGRESQL_PASSWORD=postgres
export POSTGRESQL_USER=postgres
Lastly, boot PostgreSQL. For example with Docker:
docker run --rm --name postgresdb -e POSTGRES_USER=postgres -e POSTGRES_PASSWORD=postgres -e POSTGRES_DB=postgresDB -d -p 5432:5432 postgres:13Starting the Bootable JAR application
At the end of this article you will find a simple JPA application with a REST Endpoint to return some records from the DB. To boot it, you can simply execute:
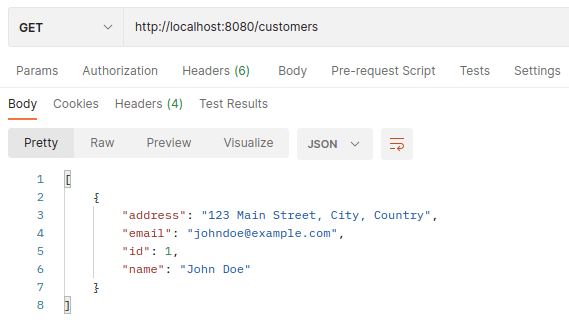
mvn install wildfly-jar:runThen, query the sample /customers endpoint to verify that you can return a Customer from the PostgreSQL DB:
Conclusion
WildFly Bootable JAR revolutionizes the deployment paradigm by offering a convenient, self-contained packaging format for Jakarta EE applications. It empowers developers to simplify the creation of resources such as Datasources or other Jakarta EE resources.
Source code: https://github.com/fmarchioni/mastertheboss/tree/master/bootable-jar/datasource
Recommended Articles
Learn How to Use OpenTelemetry API with WildFly Bootable Jar Technology
Master using OpenTelemetry API for observability in your WildFly bootable jar service. Learn from expert tutorials.
WildFly Bootable Jar with Embedded-Artemis MQ Server - A Comprehensive Guide
Learn how to embed Artemis MQ Server in a WildFly Bootable Jar for Jakarta EE applications. #WildFly27 #ArtemisMQ #BootableJar #JavaEE
Execute CLI Scripts in WildFly Bootable Jar: A Step-by-Step Guide
Learn how to customize your WildFly Bootable JAR configuration by executing CLI scripts during packaging or at runtime. Follow our expert guide to get started with bootable microservice-like components.
Creating a Clustered Application with WildFly Bootable JAR
Learn how to create a simple clustered HTTP application using WildFly bootable jar option and Infinispan/jGroups for web-clustering layer