Reactive Messaging with AMQP and WildFly
In the second article of this series, we will learn how to code, configure and deploy a Reactive Application using WildFly and an AMQP Broker such as Artemis MQ. We will show step-by-step how to set up the environment with Docker and deploy an example application on WildFly.
MicroProfile Reactive Messaging with AMQP
WildFly supports, since version 31, the capability to run Reactive applications using a Connector the AMQP 1.0 protocol. As a proof of concept, we will deploy the same application tested with Apache Kafka (Writing Reactive Applications with WildFly ) with some minor configuration changes.
Requirements:
- WildFly 31 or newer
- Artemis MQ as standalone installation or an environment which supports Docker Compose
Setting up Artemis MQ
Firstly, we need to set up an AMQP Compatible Broker. As a matter of fact, Artemis MQ supports out of the box an AMQP Connector on Port 5672:
<acceptor name="amqp">tcp://0.0.0.0:5672?tcpSendBufferSize=1048576;tcpReceiveBufferSize=1048576;protocols=AMQP;useEpoll=true;amqpCredits=1000;amqpLowCredits=300;amqpMinLargeMessageSize=102400;amqpDuplicateDetection=true</acceptor>The simplest way to bootstrap a default Artemis MQ is to use the following docker-compose.yml which uses the default ports and admin/admin as credentials:
version: '2'

services:
  artemis:
    image: quay.io/artemiscloud/activemq-artemis-broker
    ports:
      - "5672:5672"
      - "61616:61616"
    volumes:
      - ./broker/broker.xml:/opt/amq/conf/broker.xml
    environment:
      AMQ_USER: "admin"
      AMQ_PASSWORD: "admin"
More details about using Artemis MQ with Docker are available here: How to run Artemis MQ as Docker Image
Then, start the broker as follows:
docker-compose upFinally, verify that the Broker is up and running:
artemis_1  | 2024-02-23 08:44:28,040 INFO  [org.apache.activemq.artemis] AMQ241001: HTTP Server started at http://172.24.0.2:8161
artemis_1  | 2024-02-23 08:44:28,041 INFO  [org.apache.activemq.artemis] AMQ241002: Artemis Jolokia REST API available at http://172.24.0.2:8161/console/jolokia
artemis_1  | 2024-02-23 08:44:28,041 INFO  [org.apache.activemq.artemis] AMQ241004: Artemis Console available at http://172.24.0.2:8161/console
Setting up WildFly for Reactive Messaging
Next, we will move on the application server side. Since MicroProfile reactive Messaging is not a default extension available in the configuration we need to add it. From the CLI execute:
batch
/extension=org.wildfly.extension.microprofile.reactive-messaging-smallrye:add
/extension=org.wildfly.extension.microprofile.reactive-streams-operators-smallrye:add
/subsystem=microprofile-reactive-streams-operators-smallrye:add
/subsystem=microprofile-reactive-messaging-smallrye:add
run-batch

reload
Configuring the Reactive Project
We will be using the same code base discussed in the first article of this series, which contains produces and consumes messages of type WeatherData:
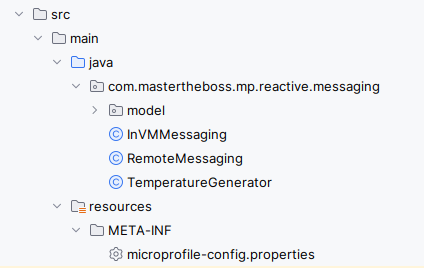
We will apply the following changes to the project:
Firstly, modify the microprofile-config.properties to include the Artemis MQ Settings. Also define the connector as smallrye-amqp Connector :
amqp-host=localhost
amqp-port=5672
amqp-username=admin
amqp-password=admin

mp.messaging.outgoing.to-amq.connector=smallrye-amqp
mp.messaging.outgoing.to-amq.address=queueDemo

mp.messaging.incoming.from-amq.connector=smallrye-amqp
mp.messaging.incoming.from-amq.address=queueDemo
Then, as you can see from the configuration, we have renamed the channel names to “to-amq” and “from-amq“. Propagate the changes also in the RemoteMessaging Class:
@Incoming("sender")
@Outgoing("to-amq")
public WeatherData producWeatherData(WeatherData message) {
        System.out.println("Sent WeatherData to Remote System : " + message);
        return message;
}

@Incoming("from-amq")
public CompletionStage<Void> consumeWeatherData(Message<WeatherData> message) {
        System.out.println("Consumed WeatherData from Remote System: " + message.getPayload());
        return message.ack();

}
Finally, include the smallrye-reactive-messaging-amqp dependency in your project:
<dependency>
	<groupId>io.smallrye.reactive</groupId>
	<artifactId>smallrye-reactive-messaging-amqp</artifactId>
	<version>4.17.0</version>
	<scope>provided</scope>
</dependency>
That’s all. You can now deploy the application on WildFly:
mvn install wildfly:deployYou should be able to see the same output we have experimented with Apache Kafka:
16:28:57,546 INFO  [stdout] (pool-15-thread-1) Got Weather : WeatherData[city=Paris, temperature=19]
16:28:57,547 INFO  [stdout] (pool-15-thread-1) Sent WeatherData to Remote System : WeatherData[city=Paris, temperature=19]
16:28:57,553 INFO  [stdout] (vert.x-eventloop-thread-0) Consumed WeatherData from Remote System: {"city":"Paris","temperature":19}
16:28:59,549 INFO  [stdout] (pool-15-thread-1) Got Weather : WeatherData[city=London, temperature=11]
16:28:59,550 INFO  [stdout] (pool-15-thread-1) Sent WeatherData to Remote System : WeatherData[city=London, temperature=11]
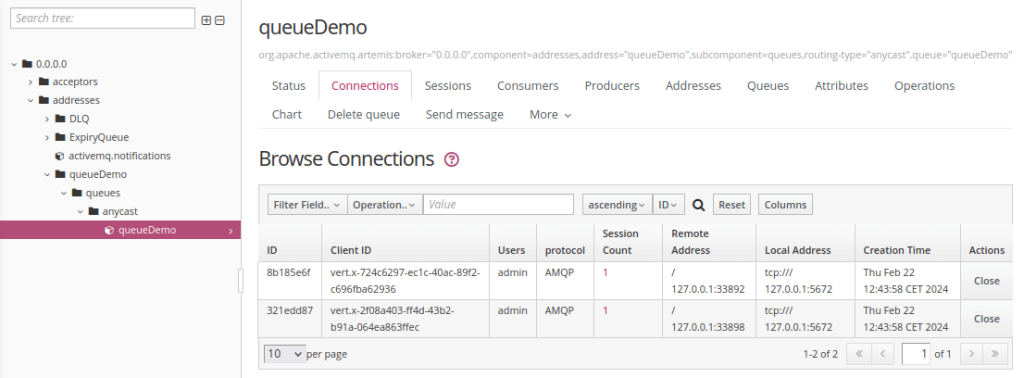
Besides, you can also check the Artemis Web Console which is available at port 8161. Connect to it and verify the current Sessions/Producers/Consumers which are active on the queueDemo:
Make your application bootable with WildFly Glow
Turning our WildFly application into a Bootable JAR is a piece of cake since we can use WildFly Glow Project. All you need to provision a bootable JAR application is to execute the wildfly-glow script against our WAR file as follows:
./wildfly-glow scan /path/microprofile-reactive-messaging-amqp.war --provision=BOOTABLE_JARWildFly Glow will start scanning your package and produce a Bootable JAR file:
Wildfly Glow is scanning...
context: bare-metal
enabled profile: none
galleon discovery
- feature-packs
   org.wildfly:wildfly-galleon-pack:31.0.0.Final
- layers
   ee-core-profile-server
   microprofile-reactive-messaging-amqp

enabled add-ons
- amqp : Support for the MicroProfile Reactive Messaging AMQP connector.

Building WildFly Bootable JAR file...
Resolving feature-packs
Installing packages
Resolving artifacts
Generating configurations
Delayed generation, waiting...
Copy ./examples/microprofile-reactive-messaging-amqp.war to /tmp/wildfly-glow-bootable13267406566313063718/standalone/deployments/microprofile-reactive-messaging-amqp.war
Bootable JAR build DONE.
To run the jar call: 'java -jar microprofile-reactive-messaging-amqp-31.0.0.Final-bootable.jar'
Then, just run the application with the suggested command from the output:
java -jar microprofile-reactive-messaging-amqp-31.0.0.Final-bootable.jarAnd you have got up and running your Messaging application as Bootable JAR!
10:32:27,460 INFO  [org.jboss.as.server] (ServerService Thread Pool -- 24) WFLYSRV0010: Deployed "microprofile-reactive-messaging-amqp.war" (runtime-name : "microprofile-reactive-messaging-amqp.war")
10:32:27,491 INFO  [org.jboss.as.server] (Controller Boot Thread) WFLYSRV0212: Resuming server
10:32:27,494 INFO  [org.jboss.as] (Controller Boot Thread) WFLYSRV0060: Http management interface listening on http://127.0.0.1:9990/management
10:32:27,494 INFO  [org.jboss.as] (Controller Boot Thread) WFLYSRV0054: Admin console is not enabled
10:32:27,495 INFO  [org.jboss.as] (Controller Boot Thread) WFLYSRV0025: WildFly Full 31.0.0.Final (WildFly Core 23.0.1.Final) started in 3153ms - Started 222 of 225 services (35 services are lazy, passive or on-demand) - Server configuration file in use: standalone.xml
10:32:27,593 INFO  [io.smallrye.reactive.messaging.amqp] (vert.x-eventloop-thread-0) SRMSG16213: Connection with AMQP broker established
10:32:27,611 INFO  [io.smallrye.reactive.messaging.amqp] (vert.x-eventloop-thread-0) SRMSG16213: Connection with AMQP broker established
10:32:27,621 INFO  [io.smallrye.reactive.messaging.amqp] (vert.x-eventloop-thread-0) SRMSG16203: AMQP Receiver listening address queueDemo
10:32:29,394 INFO  [stdout] (pool-11-thread-1) Got Weather : WeatherData[city=Paris, temperature=12]
10:32:29,402 INFO  [stdout] (pool-11-thread-1) Sent WeatherData to Remote System : WeatherData[city=Paris, temperature=12]
To learn more about WildFly Glow you can check this article: WildFly Glow: Next-Gen Evolution in Provisioning
Conclusion
This article covered how to configure a Reactive Application to produce and consume Messages through the AMQP Connector which is available in WildFly 31 or newer. Since the layer microprofile-reactive-messaging-amqp is also available in Galleon, we have built our application also as Bootable JAR.
Source code: https://github.com/fmarchioni/mastertheboss/tree/master/micro-services/microprofile-amq-demo
Recommended Articles
Configure WildFly for Reactive Messaging with RabbitMQ AMQP 1.0 Support
Learn how to configure WildFly as a broker for a reactive application using RabbitMQ's AMQP 1.0 protocol.
Design and Deploy Messaging Reactive Application with WildFly and Apache Kafka
Learn how to design, configure, and deploy a MicroProfile Reactive Messaging application using WildFly and Apache Kafka. #MicroProfileReactive #WildFly #ApacheKafka
Bootstrap and Deploy a MicroProfile Application on Common Runtimes - Jakarta EE Transition Guide
Learn how to bootstrap and deploy a MicroProfile application using Jakarta EE standards, perfect for cloud-native development.
Build and Deploy Microprofile Applications on Wildfly with MicroProfile API Support
Learn how to create and deploy Microprofile applications on Wildfly with the latest version of Microprofile API support, combining Jakarta EE and MicroProfile APIs.