Managing Keycloak user metadata and custom attributes
Each user that is stored in Keycloak can store basic Metadata information such as name and email. Besides that, you can store arbitrary user attributes, also called Custom Attributes. In this tutorial, we will show an example application which retrieves User Metadata and Custom Attributes for a Keycloak Realm.
This tutorial assumes that you are using the latest version of Keycloak,(powered by Quarkus). If you are new to Keycloak we recommend checking this introduction tutorial: Getting started with Keycloak powered by Quarkus
Firstly, start Keycloak server. We will use port 8180 to avoid conflicts with our application running on Port 8080:
./kc.sh start-dev --http-port=8180Next, create an Admin user. We assume that you have an admin user with “admin” as user and password.
Then, we will create a Realm with an User and some MetaData information in it. You can either create the Keycloak Realm from the UI, or you can use the kcadm.sh script available in the “bin” folder of Keycloak.
Here is a basic script which will create:
- A Keycloak Realm named “security-realm”
- A Role named “customer-manager”
- An User named “customer-admin” belonging to the “customer-manager” Role with an email as MetaData
- A Client application named “customer-manager-client” redirecting to “http://localhost:8080” after login:
./kcadm.sh config credentials --server http://localhost:8180 --realm master --user admin --password admin

./kcadm.sh create realms -s realm=security-realm -s enabled=true -o

./kcadm.sh create users -r security-realm -s username=customer-admin -s enabled=true -s email=mymail@admin.org

./kcadm.sh set-password -r security-realm --username customer-admin --new-password admin

./kcadm.sh create clients -r security-realm -s clientId=customer-manager-client -s secret="mysecret" -s "redirectUris=[\"http://localhost:8080/*\"]" -s enabled=true

./kcadm.sh create roles -r security-realm -s name=customer-manager

./kcadm.sh add-roles --uusername customer-admin --rolename customer-manager -r security-realm
Creating an application which manages Keycloak’s User Metadata and Custom Attributes
In order to manage Keycloak metadata and attributes we will need the following API:
- org.keycloak.KeycloakSecurityContext: this interface is required if you need to access to the tokens directly.
- org.keycloak.KeycloakPrincipal: this class is required to access information (such as MetaData or attributes) from a Keycloak User
Here is a sample Spring Boot Controller which access our user’s MetaData:
package com.example.keycloak.web;

import java.util.Map;
import org.keycloak.KeycloakPrincipal;
import org.keycloak.KeycloakSecurityContext;
import org.keycloak.adapters.springsecurity.token.KeycloakAuthenticationToken;
import org.springframework.web.bind.annotation.GetMapping;
import org.springframework.web.bind.annotation.RestController;


@RestController
public class MyResource {

	@GetMapping(path = "users")
	public String user(KeycloakAuthenticationToken keycloakAuthenticationToken) {
		@SuppressWarnings("unchecked")
		KeycloakPrincipal<KeycloakSecurityContext> principal = (KeycloakPrincipal<KeycloakSecurityContext>) keycloakAuthenticationToken
		.getPrincipal();

		StringBuffer html = new StringBuffer();
		html.append("Principal: "+principal.getName());
		html.append("<br />");

		html.append(principal.getKeycloakSecurityContext().getToken().getEmail());
		html.append("<br />");


		return html.toString();
	}


}
As you can see from the code, we are retrieving the Principal’s name and some Metadata (the email address).
In order to bind the “/users” REST Endpoint with the “customer-manager” Role, we need to plug-in a org.keycloak.adapters.springsecurity.KeycloakConfiguration class:
@KeycloakConfiguration
public class SecurityConfig extends KeycloakWebSecurityConfigurerAdapter {

	@Autowired
	public void configureGlobal(AuthenticationManagerBuilder auth) throws Exception {
		KeycloakAuthenticationProvider keycloakAuthenticationProvider = keycloakAuthenticationProvider();
		keycloakAuthenticationProvider.setGrantedAuthoritiesMapper(new SimpleAuthorityMapper());
		auth.authenticationProvider(keycloakAuthenticationProvider);
	}

	@Bean
	@Override
	protected SessionAuthenticationStrategy sessionAuthenticationStrategy() {
		return new RegisterSessionAuthenticationStrategy(new SessionRegistryImpl());
	}

	@Bean
	public KeycloakConfigResolver KeycloakConfigResolver() {
		return new KeycloakSpringBootConfigResolver();
	}

	@Override
	protected void configure(HttpSecurity http) throws Exception {
		super.configure(http);
		http.authorizeRequests().antMatchers("/users").hasRole("customer-manager")
				.anyRequest().authenticated();

	}

}
Finally, we need to specify the Client information and the Keycloak Realm in the application.properties configuration file:
server.port=8080

keycloak.realm = security-realm
keycloak.auth-server-url = http://localhost:8180
keycloak.resource = customer-manager-client
keycloak.credentials.secret = mysecret
keycloak.principal-attribute=customer-admin
The full source code for this application is available at the end of this tutorial.
Next, start the Spring Boot application:
$ mvn install spring-boot:runThen, move to the following pag: http://localhost:8080/users
The keycloak Login UI will prompt:

Principal: cc0f4da7-eeb5-4925-906b-1032e561a9fc
mymail@admin.org
Adding Custom attributes to our Realm
Well done! the first part of our example is now complete. Let’s add a Custom Attribute to our user. Custom Attributes are used to extend the basic Metadata information available to Users.
We will add a Custom Attribute from Keycloak Admin application. Select the Users Panel and check the Attributes Tab. There Click to Add an Attribute and Save it.
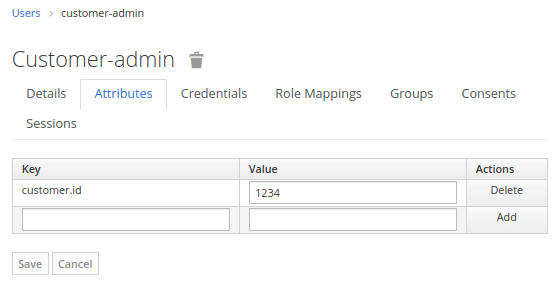
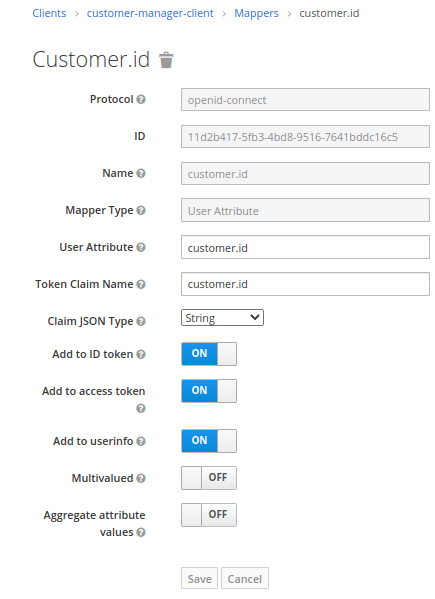
Above you can see the Mapper that has been added for the User attribute “customer.id“. Save the Mapper.
Fetching Custom attributes from your application
Now that your Keycloak Realm includes a Custom attribute, let’s enhance our application to iterate through the Custom Attributes. Within our Controller application, we will add the following iteration:
Map<String, Object> customClaims = (principal.getKeycloakSecurityContext().getToken().getOtherClaims());
for (Map.Entry<String, Object> entry : customClaims.entrySet()) {
	html.append(entry.getKey() + "/" + entry.getValue());
	html.append("<br />");
}
As you can see, from your Keycloak Token we collect the “other claims” and we print the list of keys, values.
If you run again the application, you will see all Custom Attributes available in the Token;
Principal: cc0f4da7-eeb5-4925-906b-1032e561a9fc
sid/ddab93fb-e51b-463b-83d7-831275829207
customer/{id=1234}
mymail@admin.org
Conclusion
We have covered how to define MetaData and Custom Attributes for Keycloak Users and how to fetch them from a Java application. The source code for this tutorial is available here:
https://github.com/fmarchioni/mastertheboss/tree/master/keycloak/custom-attributes
Recommended Articles
Add New User to Keycloak Using Command Line Interface (CLI) and Quarkus
Learn how to add a new user in Keycloak using CLI for both legacy and Quarkus distributions. Includes step-by-step instructions.
Automatically Create an Admin User in Keycloak Using Environment Variables and Web Console
How to add an admin user in Keycloak 26.7: the Web Console, KC_BOOTSTRAP_ADMIN_USERNAME/PASSWORD, the kc.sh bootstrap-admin command for setup and password recovery, and Kubernetes Secret best practices.
Mastering Keycloak's Embedded H2 Database: Deleting an User
Learn how to access and manage Keycloak's embedded H2 database for common tasks like deleting a user. #Keycloak #H2Database #Java #CloudNative
Keycloak Tutorial: Setting Up and Configuring WildFly with the Latest Stable Build
Learn how to set up and configure Keycloak for an Enterprise application running on WildFly. Includes steps for downloading, starting, and configuring a Keycloak Realm.