How to Test Quarkus applications
Learn how to test Quarkus 3.x applications using JUnit 5 and REST-Assured updated for Jakarta EE (jakarta.*) and RESTEasy Reactive. This guide covers the @QuarkusTest lifecycle, HTTP endpoint testing with @TestHTTPEndpoint and @TestHTTPResource, continuous testing in dev mode, test callbacks, and custom test profiles.
In this tutorial, we’ll have a look at writing tests for Quarkus 3.x applications. We’ll cover unit and integration tests that you can run using the JUnit 5 testing framework and RESTAssured, which simplifies testing RESTful APIs and reactive endpoints built with RESTEasy Reactive.
The @QuarkusTest annotation
You can test Quarkus applications with any Java-based testing framework. However, your testing workflow is greatly simplified by using JUnit 5 along with Quarkus testing extensions. Quarkus is fully integrated with the REST Assured framework for validating REST endpoints.
REST Assured provides a domain-specific language (DSL) to easily assert HTTP endpoints, request headers, and response payloads.
The core foundation of the Quarkus testing framework is the io.quarkus.test.junit.QuarkusTest annotation.
When you annotate a test class with @QuarkusTest, your tests execute within the full Quarkus runtime context lifecycle:
- The Quarkus runtime boots up. When the application is ready to serve requests, test execution begins.
- Each
@Testmethod executes against the running live application instance. - The Quarkus application gracefully stops after all tests in the class complete.
Let’s look at a practical example of testing a Jakarta REST endpoint in Quarkus 3.x.
Endpoint Resource Testing
First, we will cover testing a simple Resource Endpoint. With Quarkus 3.x, endpoints utilize Jakarta EE imports (jakarta.ws.rs.*, jakarta.inject.*) alongside RESTEasy Reactive:
package org.acme;

import jakarta.inject.Inject;
import jakarta.ws.rs.GET;
import jakarta.ws.rs.POST;
import jakarta.ws.rs.Path;
import jakarta.ws.rs.core.Response;
import java.util.List;

@Path("/hero")
public class HeroEndpoint {
    @Inject HeroService service;

    @GET
    public List<Hero> list() {
        return service.getHeros();
    }

    @POST
    public Response create(Hero hero) {
        service.add(hero);
        return Response.ok(hero).status(201).build();
    }
}
The HeroService CDI bean manages hero items using standard jakarta.enterprise.context.ApplicationScoped:
package org.acme;

import jakarta.enterprise.context.ApplicationScoped;
import java.util.ArrayList;
import java.util.Arrays;
import java.util.List;

@ApplicationScoped
public class HeroService {
    private List<Hero> heros = new ArrayList<>(
            Arrays.asList(new Hero("Bruce","Wayne"), new Hero("Peter","Parker")) );

    public List<Hero> getHeros() {
        return heros;
    }

    public void add(Hero hero) {
        getHeros().add(hero);
    }
}
Now, let's write our JUnit 5 integration test using @QuarkusTest and REST Assured assertions:
package org.acme;

import io.quarkus.test.junit.QuarkusTest;
import org.junit.jupiter.api.Test;

import static io.restassured.RestAssured.given;
import static org.hamcrest.CoreMatchers.containsString;
import static org.hamcrest.CoreMatchers.is;

@QuarkusTest
public class HeroEndpointTest {

    @Test
    public void testSize() {
        given()
        .when().get("/hero")
        .then()
        .statusCode(200);
    }

    @Test
    public void testBody() {
        given()
        .when().get("/hero")
        .then()
        .statusCode(200)
        .body(
                containsString("\"name\":\"Bruce\",\"surname\":\"Wayne\""),
                containsString("\"name\":\"Peter\",\"surname\":\"Parker\""));
    }

    @Test
    public void testPost() {
        given()
        .body("{\"name\": \"Bruce\", \"surname\": \"Banner\"}")
        .header("Content-Type", "application/json")
        .when()
        .post("/hero")
        .then()
        .statusCode(201);

        given()
        .when().get("/hero")
        .then()
        .statusCode(200)
        .body("$.size()", is(3),
                "[0].name", is("Bruce"),
                "[0].surname", is("Wayne"),
                "[1].name", is("Peter"),
                "[1].surname", is("Parker"),
                "[2].name", is("Bruce"),
                "[2].surname", is("Banner"));
    }

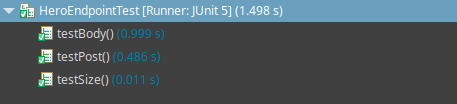
}- The testSize method checks the HTTP status code returned by the REST Endpoint (
/hero). - The testBody method verifies the JSON payload returned by
GET /herousing Hamcrest'scontainsStringmatchers. - The testPost method submits a new JSON object using HTTP POST and verifies the state update with JSON path matchers.
Running the Test
To build and test Quarkus 3.x applications using @QuarkusTest, make sure your Maven project includes quarkus-junit5 and rest-assured dependencies:
<dependency>
    <groupId>io.quarkus</groupId>
    <artifactId>quarkus-junit5</artifactId>
    <scope>test</scope>
</dependency>
<dependency>
    <groupId>io.rest-assured</groupId>
    <artifactId>rest-assured</artifactId>
    <scope>test</scope>
</dependency>
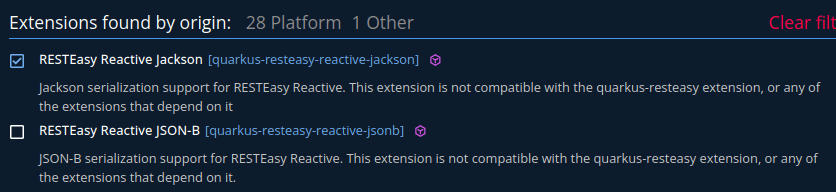
These dependencies are automatically generated when creating a new application via the Quarkus Online Initializer. In Quarkus 3.x, JSON serialization is configured using RESTEasy Reactive with Jackson or JSON-B:
To run your test suite from the command line, simply execute:
mvn clean testIf your IDE supports JUnit 5, you can also run individual test classes directly within your workspace:
By default, Quarkus uses port 8081 for executing HTTP integration tests with a standard timeout for REST Assured connections. You can easily customize these defaults inside application.properties:
quarkus.http.test-port=8083
quarkus.http.test-timeout=10s
Adding @TestHTTPEndpoint to your Class
In basic tests, hardcoding endpoint URLs across multiple test methods can create repetition:
given()
 .when().get("/hero")
 .then()
 .statusCode(200);
You can decouple the path from individual test methods using the @TestHTTPEndpoint annotation:
package org.acme;

import io.quarkus.test.common.http.TestHTTPEndpoint;
import io.quarkus.test.junit.QuarkusTest;
import org.junit.jupiter.api.Test;

import static io.restassured.RestAssured.given;

@QuarkusTest
@TestHTTPEndpoint(HeroEndpoint.class)
public class HeroEndpointTest {

    @Test
    public void testSize() {
        given()
        .when().get()
        .then()
        .statusCode(200);
    }

    // Additional test methods
}
Using @TestHTTPEndpoint(HeroEndpoint.class), Quarkus automatically inspects the target resource class and extracts its Jakarta REST @Path annotation.
Testing an HTTP Resource of your Quarkus application
You can also test static web resources or static files using @TestHTTPResource. This annotation binds directly to a java.net.URL instance. You can read the target web asset as an InputStream to assert page content. In this example, we check whether our static page contains the expected HTML title:
package org.acme;

import io.quarkus.test.common.http.TestHTTPResource;
import io.quarkus.test.junit.QuarkusTest;
import org.junit.jupiter.api.Assertions;
import org.junit.jupiter.api.Test;

import java.io.ByteArrayOutputStream;
import java.io.IOException;
import java.io.InputStream;
import java.net.URL;
import java.nio.charset.StandardCharsets;

@QuarkusTest
public class CustomerEndpointHTTPTest {

    @TestHTTPResource("index.html")
    URL url;

    @Test
    public void testIndexHtml() throws Exception {
        try (InputStream in = url.openStream()) {
            String contents = readStream(in);
            Assertions.assertTrue(contents.contains("<title>Quarkus-hibernate example</title>"));
        }
    }

    private static String readStream(InputStream in) throws IOException {
        byte[] data = new byte[1024];
        int r;
        ByteArrayOutputStream out = new ByteArrayOutputStream();
        while ((r = in.read(data)) > 0) {
            out.write(data, 0, r);
        }
        return new String(out.toByteArray(), StandardCharsets.UTF_8);
    }
}
Adding Callbacks for each test
JUnit 5 provides lifecycle annotations such as @BeforeAll, @BeforeEach, @AfterEach, and @AfterAll out of the box:
import org.junit.jupiter.api.AfterAll;
import org.junit.jupiter.api.AfterEach;
import org.junit.jupiter.api.BeforeAll;
import org.junit.jupiter.api.BeforeEach;

class StandardTests {

    @BeforeAll
    static void initAll() {
    }

    @BeforeEach
    void init() {
    }

    @AfterEach
    void tearDown() {
    }

    @AfterAll
    static void tearDownAll() {
    }

}
To hook into custom lifecycle callbacks specifically managed by @QuarkusTest, implement the QuarkusTestBeforeEachCallback and QuarkusTestAfterEachCallback interfaces:
package org.acme;

import io.quarkus.test.junit.callback.QuarkusTestAfterEachCallback;
import io.quarkus.test.junit.callback.QuarkusTestBeforeEachCallback;
import io.quarkus.test.junit.callback.QuarkusTestMethodContext;

public class TestCallBackExample implements QuarkusTestBeforeEachCallback, QuarkusTestAfterEachCallback {

    @Override
    public void beforeEach(QuarkusTestMethodContext context) {
        System.out.println("Executing " + context.getTestMethod());
    }

    @Override
    public void afterEach(QuarkusTestMethodContext context) {
        System.out.println("Executed " + context.getTestMethod());
    }
}
To register these custom callbacks, declare them in Java SPI files located under src/main/resources/META-INF/services/ matching the interface names:
$ tree src/main/resources/
src/main/resources/
├── application.properties
├── import.sql
└── META-INF
    ├── resources
    │   └── index.html
    └── services
        ├── io.quarkus.test.junit.callback.QuarkusTestAfterEachCallback
        └── io.quarkus.test.junit.callback.QuarkusTestBeforeEachCallback
Inside both SPI files, specify the fully qualified implementation class name:
org.acme.TestCallBackExampleContinuous Testing
Quarkus features dev-mode live coding and zero-delay Continuous Testing. When running your app in dev mode, test execution runs seamlessly in the background as you edit source code:
$ mvn quarkus:devThe developer console displays live continuous testing statuses and control hotkeys:
__  ____  __  _____   ___  __ ____  ______
 --/ __ \/ / / / _ | / _ \/ //_/ / / / __/
 -/ /_/ / /_/ / __ |/ , _/ ,< / /_/ /\ \
--\___\_\____/_/ |_/_/|_/_/|_|\____/___/
2024-03-20 09:19:03,796 INFO  [io.quarkus] (Quarkus Main Thread) basic-test 1.0.0-SNAPSHOT on JVM (powered by Quarkus 3.8.2) started in 1.291s. Listening on: http://localhost:8080

2024-03-20 09:19:03,798 INFO  [io.quarkus] (Quarkus Main Thread) Profile dev activated. Live Coding activated.
2024-03-20 09:19:03,799 INFO  [io.quarkus] (Quarkus Main Thread) Installed features: [cdi, resteasy-reactive, resteasy-reactive-jackson, smallrye-context-propagation, vertx]

--
Tests paused
Press [r] to resume testing, [o] Toggle test output, [:] for the terminal, [h] for more options>
Press r in your terminal prompt to run tests instantly whenever project files change:
All 3 tests are passing (0 skipped), 3 tests were run in 2234ms. Tests completed at 09:23:36.Pressing h shows available terminal controls:
[r] - Re-run all tests
[f] - Re-run failed tests
[b] - Toggle 'broken only' mode, where only failing tests are run (disabled)
[v] - Print failures from the last test run
[p] - Pause tests
[o] - Toggle test output (disabled)
[i] - Toggle instrumentation based reload (disabled)
[l] - Toggle live reload (enabled)
[s] - Force restart
[h] - Display this help
[q] - Quit
Using a specific profile for your Quarkus Tests
Quarkus standard builds include built-in configuration profiles:
- dev – Active in development mode (
mvn quarkus:dev). - test – Active automatically during test phase execution.
- prod – Default execution profile when running packed production binaries.
You can set profile-specific configuration properties in application.properties using profile prefixes:
%{profile}.config.key=valueFor example, configure distinct database settings per runtime environment:
%dev.quarkus.datasource.jdbc.url=jdbc:postgresql://localhost:5432/postgresDev
%test.quarkus.datasource.jdbc.url=jdbc:postgresql://localhost:6432/postgresTest
%prod.quarkus.datasource.jdbc.url=jdbc:postgresql://localhost:7432/postgresProd
You can also define custom test configuration profiles programmatically by implementing QuarkusTestProfile:
package org.acme;

import io.quarkus.test.junit.QuarkusTestProfile;
import java.util.Map;

public class CustomProfile implements QuarkusTestProfile {

    @Override
    public Map<String, String> getConfigOverrides() {
        return Map.of("message", "Hi there!");
    }

    @Override
    public String getConfigProfile() {
        return "custom-profile";
    }
}
To execute a test suite with custom properties, assign the @TestProfile annotation:
package org.acme;

import io.quarkus.test.common.http.TestHTTPEndpoint;
import io.quarkus.test.junit.QuarkusTest;
import io.quarkus.test.junit.TestProfile;
import org.junit.jupiter.api.Test;

import static io.restassured.RestAssured.given;
import static org.hamcrest.CoreMatchers.is;

@QuarkusTest
@TestHTTPEndpoint(CustomerResource.class)
@TestProfile(CustomProfile.class)
public class CustomProfileTest {

    @Test
    public void testCustomProfile() {
        given()
                .when().get()
                .then()
                .statusCode(200)
                .body(is("Hi there!"));
    }
}
To learn how to handle threads, timeouts, and asynchronous operations in Java tests, read our companion guide: Testing with Awaitility made simple.
Frequently Asked Questions (FAQs)
How do I migrate my Quarkus test cases from javax to jakarta packages?
In Quarkus 3.x, update all EE annotations from javax.* to jakarta.*. For example, replace javax.ws.rs.Path with jakarta.ws.rs.Path and javax.inject.Inject with jakarta.inject.Inject across both your application sources and test classes.
Can I test Mutiny reactive streams and endpoints with REST-Assured in Quarkus?
Yes. RESTEasy Reactive handles subscription and non-blocking execution under the hood. When returning Mutiny reactive types like Uni<T> or Multi<T> from Jakarta REST endpoints, REST-Assured can validate HTTP responses normally once the reactive stream completes.
What port does @QuarkusTest use, and how can I change it?
By default, @QuarkusTest boots the HTTP test instance on port 8081. You can change this port by setting quarkus.http.test-port=8083 inside your application.properties file.
Source code
The source code for this example is available on GitHub: https://github.com/fmarchioni/mastertheboss/tree/master/quarkus/basic-test
Recommended Articles
A Comprehensive Comparison of WildFly Application Server and Quarkus Framework in Enterprise Java
Explore the features and use cases of WildFly and Quarkus for robust Java applications. #WildFly #Quarkus #EnterpriseJava
Create Standalone Quarkus Applications and Powerful Scripts Using JBang & Quarkus Command Mode
Learn how to develop standalone Quarkus applications with JBang and powerful scripts using Quarkus Command Mode. #Quarkus #Java #Microservices #CloudNative
Configure Default Transaction Timeout in Quarkus - A Comprehensive Guide
Learn how to configure and manage default transaction timeouts in Quarkus applications. #Quarkus #Java #Middleware
Quarkus 3: Exploring New Reactive REST Features with Mutiny
Discover how Quarkus 3 leverages Mutiny for reactive REST services in modern applications. #Quarkus #ReactiveJava #Middleware #CloudNative