How to create Quarkus Command Mode applications
Quarkus Command Mode enables building lightweight Java command-line interface (CLI) tools and batch applications using Dependency Injection (Arc), Hibernate ORM with Panache, and native compilation. In Quarkus 3.x, ensure you migrate imports from javax.* to jakarta.* and leverage @QuarkusMain and @QuarkusMainTest for streamlined command execution and testing.
Quarkus is a set of technologies to develop an entire Microservice architecture. The foundation of this architecture is typically an HTTP server serving REST Endpoints. It is however also possible to create powerful Java scripts using Quarkus advanced sets of APIs. In this tutorial, updated for Quarkus 3.x, we will learn how to create standalone Quarkus applications with a bare simple main entry point.
Quarkus as scripting tool
As the Quarkus ecosystem grows, there’s an increase in the number of options to create Quarkus runnable scripts.
In this tutorial we have discussed how to create powerful scripts with JBang and Quarkus: JBang: Create Java scripts like a pro
On the other hand, if you need to create a more complex standalone application, which includes some layers of complexity, you can use Quarkus Command Mode. When using Quarkus Command Mode, you typically would replace HTTP-focused dependencies with the lightweight quarkus-arc extension, which provides the basic Dependency Injection mechanism to your application:
<dependency>
  <groupId>io.quarkus</groupId>
  <artifactId>quarkus-arc</artifactId>
</dependency>
Let’s start with an example application which simply inserts a row in a Database, using the Command Line arguments.
Create a Quarkus Command Mode application
Firstly, create your project using the Quarkus 3.x Maven plugin:
mvn io.quarkus.platform:quarkus-maven-plugin:3.18.1:create \
     -DprojectGroupId=com.mastertheboss.quarkus \
     -DprojectArtifactId=command-line-demo \
     -DclassName="com.mastertheboss.quarkus.service.TicketService" \
     -Dextensions="quarkus-arc,quarkus-hibernate-orm-panache,quarkus-jdbc-postgresql"
Next, let’s add a Main Class to our project using standard Jakarta EE annotations:
import jakarta.inject.Inject;

import com.mastertheboss.quarkus.model.Ticket;
import com.mastertheboss.quarkus.service.TicketService;

import io.quarkus.runtime.QuarkusApplication;
import io.quarkus.runtime.annotations.QuarkusMain;

@QuarkusMain
public class TicketMain implements QuarkusApplication {

	@Inject
	TicketService service;

	@Override
	public int run(String... args) {

		if(args.length < 2) {
			System.out.println("Usage: mvn quarkus:dev -Dquarkus.args=\"<name> <seat>\"");
			return 1;
		}

		Ticket ticket = new Ticket();
		ticket.name = args[0];
		ticket.seat = args[1];
		service.createTicket(ticket);
		return 0;
	}


}
The @QuarkusMain annotation tells Quarkus that this is the main entry point.
The run method is invoked once Quarkus starts, and the application stops when it finishes.
Behind the hoods, the @QuarkusMain instance is an application scoped bean by default. It has access to singletons, application and dependent scoped beans.
If you prefer, there’s another option to create a QuarkusMain application: you can include the standard Java static main method, and use the Java main method to launch Quarkus. Simple example:
import io.quarkus.runtime.Quarkus;
import io.quarkus.runtime.annotations.QuarkusMain;

@QuarkusMain
public class JavaMain {

    public static void main(String... args) {
        Quarkus.run(TicketMain.class, args);
    }
}
Next, let’s code the TicketService using jakarta.enterprise.context.ApplicationScoped and jakarta.transaction.Transactional to persist the Ticket entry in the database:
import jakarta.enterprise.context.ApplicationScoped;
import jakarta.transaction.Transactional;

import com.mastertheboss.quarkus.model.Ticket;

@ApplicationScoped
public class TicketService {
    @Transactional
    public void createTicket(Ticket ticket) {
        ticket.persist();
        System.out.println("Ticket created");
    }

}
Finally, the Entity Class which extends PanacheEntity using Jakarta Persistence annotations:
import jakarta.persistence.Column;
import jakarta.persistence.Entity;

import io.quarkus.hibernate.orm.panache.PanacheEntity;

@Entity
public class Ticket extends PanacheEntity {

    @Column(length = 20, unique = true)
    public String name;

    @Column(length = 3, unique = true)
    public String seat;

    public Ticket() {
    }

    public Ticket(String name, String seat) {
        this.name = name;
        this.seat = seat;
    }
}
To learn more about Panache: Data Persistence with Quarkus and Hibernate Panache
To connect to PostgreSQL we will add the following configuration in application.properties:
quarkus.datasource.db-kind=postgresql
quarkus.datasource.username=quarkus
quarkus.datasource.password=quarkus
quarkus.datasource.jdbc.url=jdbc:postgresql://localhost/quarkusdb

quarkus.hibernate-orm.database.generation=drop-and-create
quarkus.hibernate-orm.log.sql=true
Running the Command Mode application
Our application is ready to be run. Before that, we need to start a PostgreSQL server:
docker run --ulimit memlock=-1:-1 -it --rm=true --memory-swappiness=0 --name quarkus_test -e POSTGRES_USER=quarkus -e POSTGRES_PASSWORD=quarkus -e POSTGRES_DB=quarkusdb -p 5432:5432 postgresFinally, we can run the application. To pass arguments to the Main Class, you can use the -Dquarkus.args option:
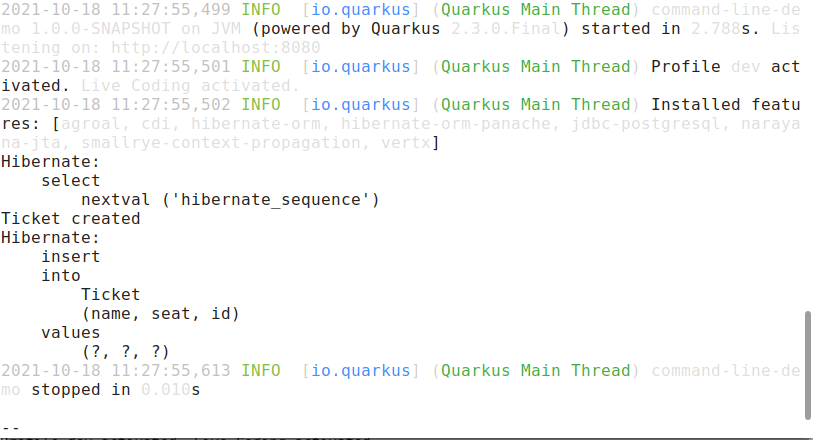
mvn quarkus:dev -Dquarkus.args="John AB1"The application will start and, as you can see from the logs, it inserts the Ticket in the database:
Coding a Test Main class
Lastly, we will show how to create a JUnit test for Quarkus Main applications. The simplest way to do that is decorating the test class with @QuarkusMainTest. In addition, we will add multiple @Launch points, each one with its own set of parameters and exit code:
import io.quarkus.test.junit.main.Launch;
import io.quarkus.test.junit.main.LaunchResult;
import io.quarkus.test.junit.main.QuarkusMainTest;

import static org.junit.jupiter.api.Assertions.assertTrue;

import org.junit.jupiter.api.Test;

@QuarkusMainTest
public class TicketServiceTest {

    @Test
    @Launch({ "John", "AB1"})
    public void testLaunchCommand(LaunchResult result) {
    	assertTrue(result.getOutput().indexOf("Ticket created") > 0 );
    }

    @Test
    @Launch(value = {}, exitCode = 1)
    public void testLaunchCommandFailed() {
    }


}
As a result, both Tests will run and complete successfully:
[INFO] -------------------------------------------------------
[INFO]  T E S T S
[INFO] -------------------------------------------------------
[INFO] Running com.mastertheboss.quarkus.service.TicketServiceTest
. . . . .
2024-03-18 11:34:36,754 INFO  [io.quarkus] (main) Quarkus stopped in 0.012s
[INFO] Tests run: 2, Failures: 0, Errors: 0, Skipped: 0, Time elapsed: 4.774 s - in com.mastertheboss.quarkus.service.TicketServiceTest
Frequently Asked Questions (FAQs)
What is the difference between Quarkus Command Mode and traditional HTTP microservices?
Quarkus Command Mode applications execute a task (such as a CLI script, migration tool, or batch job) and terminate once execution finishes, rather than staying active and listening for HTTP REST requests on a port.
How do I pass command-line parameters to a Quarkus Command Mode application in dev mode?
You can pass positional arguments or flags directly via Maven using the -Dquarkus.args="..." system property when running mvn quarkus:dev.
Can Quarkus Command Mode applications be compiled to GraalVM native images?
Yes, Quarkus Command Mode fully supports native compilation using mvn package -Dnative. This produces an ultra-fast launching binary executable ideal for CLI utilities and serverless tasks.
Source code available here:
https://github.com/fmarchioni/mastertheboss/tree/master/quarkus/command-line-demo
Recommended Articles
A Comprehensive Comparison of WildFly Application Server and Quarkus Framework in Enterprise Java
Explore the features and use cases of WildFly and Quarkus for robust Java applications. #WildFly #Quarkus #EnterpriseJava
Introduce IntelliJ Quarkus Plugin: Simplify and Productively Develop with Quarkus Technology
Discover how to bootstrap and develop Quarkus projects using JetBrains IntelliJ's Quarkus plugin. Learn about the latest updates, installation process, and features.
Optimizing Your Quarkus Application with Custom Undertow Server Settings
Learn how to customize your Quarkus application's embedded Undertow server settings. #Quarkus #Java #Middleware #CloudNative
Configure Default Transaction Timeout in Quarkus - A Comprehensive Guide
Learn how to configure and manage default transaction timeouts in Quarkus applications. #Quarkus #Java #Middleware