Getting started with Quarkus and Hibernate
In this article we will learn how to create and run a sample Quarkus 3.x application targeting Java 21 LTS which uses Hibernate ORM and Jakarta Persistence (JPA). We will create a sample REST Endpoint to expose basic CRUD operations against a relational Database such as PostgreSQL.
Learn how to build a high-performance RESTful CRUD application using Quarkus 3.x, Java 21, Hibernate ORM (Jakarta Persistence 3.1), and PostgreSQL. Includes step-by-step instructions for Quarkus Dev Services and custom database configuration.
Create the Quarkus Project
Firstly, create a basic Quarkus 3 project. For example, using https://code.quarkus.io with Java 21 selected as the Java version.
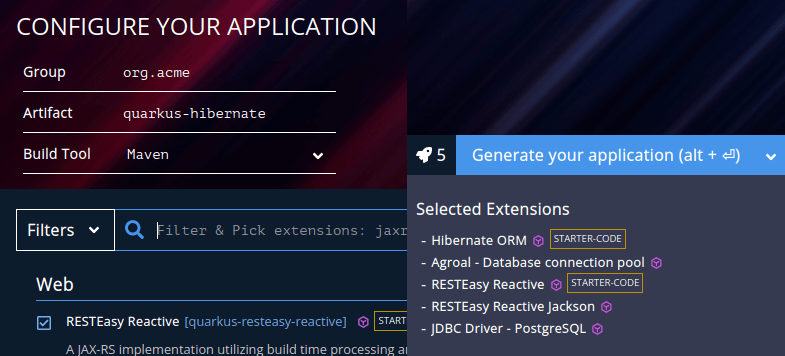
Then, unzip the project in a folder on your drive. Since this application will be using PostgreSQL from Hibernate ORM and Jakarta REST (RESTEasy Reactive), ensure your pom.xml file includes Java 21 compatibility and the following dependencies:
<properties>
    <maven.compiler.release>21</maven.compiler.release>
    <quarkus.platform.version>3.8.2</quarkus.platform.version>
</properties>

<dependencies>
    <dependency>
        <groupId>io.quarkus</groupId>
        <artifactId>quarkus-hibernate-orm</artifactId>
    </dependency>
    <dependency>
        <groupId>io.quarkus</groupId>
        <artifactId>quarkus-agroal</artifactId>
    </dependency>
    <dependency>
        <groupId>io.quarkus</groupId>
        <artifactId>quarkus-resteasy-reactive</artifactId>
    </dependency>
    <dependency>
        <groupId>io.quarkus</groupId>
        <artifactId>quarkus-resteasy-reactive-jackson</artifactId>
    </dependency>
    <dependency>
        <groupId>io.quarkus</groupId>
        <artifactId>quarkus-jdbc-postgresql</artifactId>
    </dependency>

    <!-- Testing: -->
    <dependency>
        <groupId>io.quarkus</groupId>
        <artifactId>quarkus-junit5</artifactId>
        <scope>test</scope>
    </dependency>
    <dependency>
        <groupId>io.rest-assured</groupId>
        <artifactId>rest-assured</artifactId>
        <scope>test</scope>
    </dependency>
</dependencies>
Coding the Hibernate example
To allow accessing our application from HTTP Clients, we will modify the default Endpoint to include a set of CRUD methods matching the GET/POST/PUT/DELETE HTTP methods using standard Jakarta EE packages (jakarta.ws.rs.*, jakarta.persistence.*, jakarta.transaction.*):
package org.acme;

import jakarta.inject.Inject;
import jakarta.persistence.EntityManager;
import jakarta.transaction.Transactional;
import jakarta.ws.rs.*;
import jakarta.ws.rs.core.Response;

@Path("/customer")
@Produces("application/json")
@Consumes("application/json")
public class ExampleResource {

    @Inject
    EntityManager entityManager;

    @GET
    public Customer[] get() {
        return entityManager.createNamedQuery("Customers.findAll", Customer.class)
                .getResultList().toArray(new Customer[0]);
    }

    @POST
    @Transactional
    public Response create(Customer customer) {
        if (customer.getId() != null) {
            throw new WebApplicationException("Id was invalidly set on request.", 422);
        }
        System.out.println("Creating " + customer);
        entityManager.persist(customer);
        return Response.ok(customer).status(201).build();
    }

    @PUT
    @Transactional
    public Customer update(Customer customer) {
        if (customer.getId() == null) {
            throw new WebApplicationException("Customer Id was not set on request.", 422);
        }

        Customer entity = entityManager.find(Customer.class, customer.getId());

        if (entity == null) {
            throw new WebApplicationException("Customer with id of " + customer.getId() + " does not exist.", 404);
        }

        entity.setName(customer.getName());

        return entity;
    }

    @DELETE
    @Transactional
    public Response delete(Customer customer) {
        Customer entity = entityManager.find(Customer.class, customer.getId());
        if (entity == null) {
            throw new WebApplicationException("Customer with id of " + customer.getId() + " does not exist.", 404);
        }
        entityManager.remove(entity);
        return Response.status(204).build();
    }
}
Next, we will code the Entity class using Jakarta Persistence 3.1 annotations. This class includes an example of @NamedQuery to load the list of Customer objects and the definition of a Sequence which will generate the Customer id. As we will initially add some Customer records with the import.sql script, we will set initialValue = 10:
package org.acme;

import jakarta.persistence.*;

@Entity
@NamedQuery(name = "Customers.findAll", query = "SELECT c FROM Customer c ORDER BY c.name")
public class Customer {
    private Long id;
    private String name;

    @Id
    @GeneratedValue(strategy = GenerationType.SEQUENCE, generator = "customerSequence")
    @SequenceGenerator(name = "customerSequence", sequenceName = "customerSeq", allocationSize = 1, initialValue = 10)
    public Long getId() {
        return id;
    }

    public void setId(Long id) {
        this.id = id;
    }

    public String getName() {
        return name;
    }

    public void setName(String name) {
        this.name = name;
    }

    @Override
    public String toString() {
        return "Customer{" +
                "id=" + id +
                ", name='" + name + '\'' +
                '}';
    }
}
Configuring the Database Connection
Finally, the configuration of the Database connection. If you want to opt for Quarkus Dev Services for Database, the following META-INF/application.properties configuration will be sufficient to trigger a PostgreSQL Docker image automatically in dev mode:
quarkus.datasource.db-kind=postgresql
quarkus.hibernate-orm.database.generation=drop-and-create
quarkus.hibernate-orm.sql-load-script=import.sql
On the other hand, if you want to start the Database instance yourself, then you can include the username and password along with the JDBC URL in the file META-INF/application.properties:
quarkus.datasource.db-kind=postgresql
quarkus.datasource.username=quarkus
quarkus.datasource.password=quarkus
quarkus.datasource.jdbc.url=jdbc:postgresql://localhost/quarkusdb
quarkus.datasource.jdbc.max-size=8
quarkus.datasource.jdbc.min-size=2

quarkus.hibernate-orm.database.generation=drop-and-create
quarkus.hibernate-orm.sql-load-script=import.sql
Please notice that you can also specify Hibernate properties through the META-INF/persistence.xml file using Jakarta EE 10 XML schemas. This is especially useful if you are migrating from a traditional Java EE/Jakarta EE application:
<persistence xmlns="https://jakarta.ee/xml/ns/persistence"
             xmlns:xsi="http://www.w3.org/2001/XMLSchema-instance"
             xsi:schemaLocation="https://jakarta.ee/xml/ns/persistence
             https://jakarta.ee/xml/ns/persistence/persistence_3_0.xsd"
             version="3.0">

    <persistence-unit name="CustomerPU" transaction-type="JTA">

        <description>My customer entities</description>

        <properties>
            <property name="hibernate.dialect" value="org.hibernate.dialect.PostgreSQLDialect"/>

            <property name="hibernate.show_sql" value="true"/>
            <property name="hibernate.format_sql" value="true"/>
            <property name="jakarta.persistence.schema-generation.database.action" value="drop-and-create"/>
            <property name="jakarta.persistence.validation.mode" value="NONE"/>
        </properties>

    </persistence-unit>
</persistence>
Then, we will include an import.sql file to bootstrap the application with 3 Customer objects:
INSERT INTO Customer(id, name) VALUES (1, 'Batman');
INSERT INTO Customer(id, name) VALUES (2, 'Superman');
INSERT INTO Customer(id, name) VALUES (3, 'Wonder woman');
Here is the full structure of our application:
src
├── main
│   ├── docker
│   │   ├── Dockerfile.jvm
│   │   └── Dockerfile.native
│   ├── java
│   │   └── org
│   │       └── acme
│   │           ├── Customer.java
│   │           └── ExampleResource.java
│   └── resources
│       ├── application.properties
│       ├── import.sql
│       └── META-INF
│           └── resources
│               └── index.html
├── README.md
└── test
    └── java
        └── org
            └── acme
                ├── CustomerEndpointTest.java
                └── NativeExampleResourceIT.java
Testing the application
If you are using Quarkus Dev Services with Docker or Podman running, you are ready to go!
On the other hand, if you decided to include the Database settings yourself, then make sure you start PostgreSQL first:
docker run --ulimit memlock=-1:-1 -it --rm=true --memory-swappiness=0 --name quarkus_test -e POSTGRES_USER=quarkus -e POSTGRES_PASSWORD=quarkus -e POSTGRES_DB=quarkusdb -p 5432:5432 postgres:16Next, we can start the Quarkus application in development mode:
$ mvn quarkus:dev

 __  ______  ______   ____  ______  __  _____   ___  __ ____  ______
 --/ __ \/ / / / _ | / _ \/ //_/ / / / __/  / _ \/ //_/ / / / __/
 -/ /_/ / /_/ / __ |/ , _/ ,< / /_/ /\ \   / ___/ ,< / /_/ /\ \
--\___\_\____/_/ |_/_/|_/_/|_|\____/___/  /_/  /_/|_|\____/___/
2024-03-15 10:32:31,120 INFO  [io.agr.pool] (Quarkus Main Thread) Datasource '<default>': Initial size smaller than min. Connections will be created when necessary

Hibernate:

    drop table if exists Customer cascade
Hibernate:

    drop sequence if exists customerSeq
Hibernate: create sequence customerSeq start with 10 increment by 1
Hibernate:

    create table Customer (
        id bigint not null,
        name varchar(255),
        primary key (id)
    )

Hibernate:
    INSERT INTO Customer(id, name) VALUES (1, 'Batman')
Hibernate:
    INSERT INTO Customer(id, name) VALUES (2, 'Superman')
Hibernate:
    INSERT INTO Customer(id, name) VALUES (3, 'Wonder woman')
2024-03-15 10:32:31,472 INFO  [io.quarkus] (Quarkus Main Thread) quarkus-hibernate 3.8.2 on JVM (powered by Quarkus 3.8.2) started in 1.265s. Listening on: http://localhost:8080
2024-03-15 10:32:31,472 INFO  [io.quarkus] (Quarkus Main Thread) Profile dev activated. Live Coding activated.
2024-03-15 10:32:31,473 INFO  [io.quarkus] (Quarkus Main Thread) Installed features: [agroal, cdi, hibernate-orm, jdbc-postgresql, narayana-jta, resteasy-reactive, resteasy-reactive-jackson, smallrye-context-propagation, vertx]
Let’s check at first the list of Customer objects:
curl -s http://localhost:8080/customer | jq
[
  {
    "id": 1,
    "name": "Batman"
  },
  {
    "id": 2,
    "name": "Superman"
  },
  {
    "id": 3,
    "name": "Wonder woman"
  }
]
Next, use the POST method to insert a new Customer:
curl -d '{"name":"Spiderman"}' -H "Content-Type: application/json" -X POST http://localhost:8080/customer

{"id":10,"name":"Spiderman"}
Let’s use the PUT method to modify an existing Customer:
curl -d '{"id":10,"name":"Hulk"}' -H "Content-Type: application/json" -X PUT http://localhost:8080/customer

{"id":10,"name":"Hulk"}
Finally, let’s use the DELETE method to delete an existing Customer:
curl -d '{"id":10,"name":"Hulk"}' -H "Content-Type: application/json" -X DELETE http://localhost:8080/customerLet’s check again the list of Customer objects:
curl -s http://localhost:8080/customer | jq
[
  {
    "id": 1,
    "name": "Batman"
  },
  {
    "id": 2,
    "name": "Superman"
  },
  {
    "id": 3,
    "name": "Wonder woman"
  }
]
Great! We have just learnt how to design a basic CRUD application using Quarkus 3, Jakarta Persistence, and RESTEasy Reactive running on Java 21.
Frequently Asked Questions (FAQs)
How does Quarkus 3 handle Java 21 and Jakarta EE 10 support?
Quarkus 3 fully supports Java 21 LTS runtimes as well as Jakarta EE 10 standards. All persistence annotations now reside in the jakarta.persistence.* package, replacing the older javax.persistence.* packages.
Do I need to manually start PostgreSQL when using Dev Mode?
No. Quarkus Dev Services automatically detects your PostgreSQL extension dependency and spins up a temporary container via Docker or Podman without requiring manual URL, username, or password configurations in development mode.
Can I use Panache instead of standard EntityManager with Hibernate ORM?
Yes! Quarkus provides the quarkus-hibernate-orm-panache extension, which simplifies your entity definitions and repository layers further using either the Active Record pattern or Repository pattern.
Conclusion
In this tutorial we have discussed how to run a modern Hibernate ORM Application using Jakarta Persistence API and Quarkus 3. We also have demonstrated how to use Quarkus Dev Services for Database. If you want to read more about it, check this tutorial: Zero Config Database configuration with Quarkus (DevServices)
Source code: https://github.com/fmarchioni/mastertheboss/tree/master/quarkus/hibernate
Recommended Articles
Simplify Data Persistence with Quarkus and Hibernate ORM Panache
Learn how to streamline data persistence in Quarkus projects using Hibernate ORM Panache for Java developers.
Migrate Your PostgreSQL Database with Quarkus and FlyWay: A Step-by-Step Guide
Learn how to automate version-based database migrations using Quarkus, Thorntail, and FlyWay. Follow this tutorial to create a migration project and perform a successful FlyWay migration with Quarkus and PostgreSQL.
Build a REST Application with MongoDB and Quarkus: A Step-by-Step Guide
Learn how to create a REST application with MongoDB NoSQL Database and Quarkus. Get started with MongoDB, explore the MongoDB Java Client and Hibernate Panache approaches, and build a sample application.
Mastering GraphQL with Quarkus: A Comprehensive Guide to Building Modern APIs
Learn how to create and deploy a sample application using Quarkus Runtime for GraphQL. #GraphQL #Quarkus #JavaAPIs