How to consume Quarkus REST Services with React
ReactJS is a popular and widely used Javascript library for building rich user interfaces. This article shows how to consume REST Services from a modern Quarkus 3.x application using a simple React front-end.
Connecting a React.js application with a Quarkus 3 backend requires exposing REST endpoints built with Jakarta REST (jakarta.ws.rs.*) and RESTEasy Reactive/Quarkus REST, enabling CORS cross-origin requests in application.properties, and fetching backend JSON endpoints from your React components.
Getting started with React
To get started with ReactJS, you are going to need NPM (or Yarn, alternatively). Let’s use NPM for this example.
npm installThen, since we don’t want to bootstrap React manually, we will use the create-react-app. This utility will do all the configuration and necessary package installations for us automatically. It will also start a new React app locally, ready for development.
To install it, execute:
npx create-react-app my-appIn a short time, you will see your application ready and the following resources are now available in the folder “my-app”:
$ ls
node_modules  package.json  package-lock.json  public  README.md  src
To start your React App, run the following command:
npm start
Before we update our React UI, we will design first a simple endpoint with Quarkus.
Coding the Quarkus Endpoint
We assume you have a basic knowledge of Quarkus to complete this step. If you are new to it, we recommend to check this article: Getting started with QuarkusIO
With Quarkus 3.x, the framework has fully migrated from Java EE (javax.*) to Jakarta EE 10 (jakarta.*). Quarkus REST (powered by RESTEasy Reactive) is the modern, non-blocking REST framework used by default. Our simple Quarkus endpoint produces a List of Contact objects through Jakarta REST annotations:
package com.mastertheboss.jaxrs;

import jakarta.inject.Inject;
import jakarta.ws.rs.GET;
import jakarta.ws.rs.POST;
import jakarta.ws.rs.Path;
import jakarta.ws.rs.Produces;
import jakarta.ws.rs.Consumes;
import jakarta.ws.rs.core.MediaType;
import jakarta.ws.rs.core.Response;
import java.util.List;

@Path("/contacts")
@Produces(MediaType.APPLICATION_JSON)
@Consumes(MediaType.APPLICATION_JSON)
public class ContactResource {

    @Inject
    ContactService service;

    @GET
    public List<Contact> findAll() {
        return service.getPersons();
    }

    @POST
    public Response add(Contact contact) {
        service.addPerson(contact);
        return Response.status(201).build();
    }
}
Notice that we are using the jakarta.inject.Inject and jakarta.ws.rs.* packages required in Quarkus 3.x. If you wish to leverage reactive endpoints, Mutiny reactive types such as Uni<List<Contact>> can also be returned natively from RESTEasy Reactive endpoints without blocking worker threads.
Here we won’t go into the details of the ContactService which merely keeps a List of Contact objects. Check the source code at the end of the article to see the full application.
In the end, our Quarkus application produces an array of JSON Objects like this:
[
  {
    "firstName": "Bruce",
    "lastName": "Wayne",
    "hero": "Batman"
  },
  {
    "firstName": "Peter",
    "lastName": "Parker",
    "hero": "Spiderman"
  },
  {
    "firstName": "Steve",
    "lastName": "Rogers",
    "hero": "Captain America"
  },
  {
    "firstName": "Bruce",
    "lastName": "Banner",
    "hero": "Hulk"
  }
]
Finally, before we move to the React Application, we need to enable CORS in application.properties to support cross-origin requests and data transfers between browsers and servers (since React dev server runs on port 3000 and Quarkus on port 8080):
quarkus.http.cors=trueConsuming REST with React JS
We will now connect to the Quarkus endpoint from a simple React application.
Firstly, let’s connect the REST Endpoint within our App.js file. The App Component is the main component in React which acts as a container for all other components.
Within this file, to fetch our REST data, we will use a componentDidMount() method in our App.js file. This method is executed immediately our component is mounted and we will also make our API request in that method.
import React, {Component} from 'react';
import Contacts from './components/contacts';

class App extends Component {
    render() {
        return (
            <Contacts contacts={this.state.contacts} />
        )
    }

    state = {
        contacts: []
    };

    componentDidMount() {
        fetch('http://localhost:8080/contacts')
            .then(res => res.json())
            .then((data) => {
                this.setState({ contacts: data })
            })
            .catch(console.log)
    }
}

export default App;
The fetch command will make a GET request to the endpoint, then parses the output to JSON. Finally it will set the value of our state to the output from the API call. Within the catch block we will log any error we get to the console.
Creating our contacts component
Next, we will create a component to render the JSON Data as cards. To do that, we will create a component by creating a new sub-folder named components in the src directory.
Then, we will create a contacts.js file in the components directory by running:
$ mkdir src/components
$ touch src/components/contacts.js
The contents of the contacts.js component file will be the following:
import React from 'react'

const Contacts = ({contacts}) => {
    return (
        <div>
            <center><h1>Contact List</h1></center>
            {contacts.map((contact) => (
                <div class="card">
                    <div class="card-body">
                        <h5 class="card-title">{contact.hero}</h5>
                        <h6 class="card-subtitle mb-2 text-muted">{contact.firstName}</h6>
                        <p class="card-text">{contact.lastName}</p>
                    </div>
                </div>
            ))}
        </div>
    )
};

export default Contacts
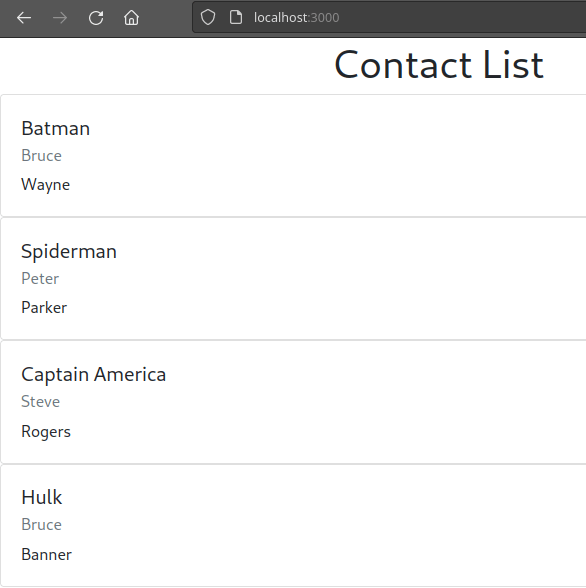
The Contacts method accepts the contacts state we created earlier and then returns a mapped version of the state, which loops over the bootstrap card to insert the Hero name along with name and surname.
Rendering the contacts component
If you go back to the App.js file, you will see that a reference to the component is available in the list of imports.
// src/App.js

import React, { Component } from 'react';
import Contacts from './components/contacts';
...
That’s all. We can now test our application.
Testing the React Application
Firstly, make sure that Quarkus endpoint is up and running. Move to the Quarkus folder and run:
mvn quarkus:devThen, move to the React project and start it with:
npm startYou will see that the list of JSON objects is rendered through using React’s Card UI:
Conclusion
This article was a quick walk-through React JS framework from installation and customization. At the end of it, we managed to consume REST Services from a modern Quarkus 3.x Endpoint.
Source code: https://github.com/fmarchioni/mastertheboss/tree/master/quarkus/reactjs-demo
Frequently Asked Questions (FAQs)
How do I enable CORS in Quarkus 3 for local React development?
In Quarkus 3, CORS is enabled by setting quarkus.http.cors=true in application.properties. For stricter production environments, you can refine allowed origins using quarkus.http.cors.origins=http://localhost:3000 along with specific allowed HTTP methods and headers.
What updates are required when migrating REST endpoints from Quarkus 2 to Quarkus 3?
Upgrading to Quarkus 3 requires migrating all Java EE package imports from javax.ws.rs.* and javax.inject.Inject to Jakarta EE 10 packages (jakarta.ws.rs.* and jakarta.inject.Inject). Furthermore, RESTEasy Reactive serves as the standard default REST engine in Quarkus 3.
Can Quarkus 3 reactive Mutiny endpoints return responses to React?
Yes. RESTEasy Reactive natively supports Mutiny reactive types such as Uni<T> and Multi<T>. When an endpoint returns a Uni<List<Contact>>, Quarkus handles the asynchronous processing non-blockingly and serializes the result back to standard JSON for the React front-end.
Recommended Articles
Query Quarkus REST Service with Ajax and jQuery
Learn how to create an Ajax front-end to a Quarkus REST application using jQuery and query a sample REST service running on Quarkus 0.16.1
Designing a Simple DMN Model with Quarkus REST Services - Part II
Learn how to design and expose a simple DMN model through Quarkus REST services. Design the example application using Kie SandBox and DMN Runner.
Run Quarkus 3 Application with Jakarta REST Service and Vue.js Front-End
Learn how to run a Quarkus 3 application using Jakarta REST Service and Vue.js. Includes CRUD methods wrapped in Vue.js functions.
Build a REST Application with MongoDB and Quarkus: A Step-by-Step Guide
Learn how to create a REST application with MongoDB NoSQL Database and Quarkus. Get started with MongoDB, explore the MongoDB Java Client and Hibernate Panache approaches, and build a sample application.