Getting started with JUnit 5 TestSuite
JUnit 5 Test Suites allow developers to aggregate and execute multiple test classes, packages, or tagged test cases in a single test run. While legacy JUnit 4 relied on @RunWith(JUnitPlatform.class), modern JUnit 5 (version 5.8+) utilizes the dedicated @Suite annotation alongside @SelectClasses and @SelectPackages from the junit-platform-suite engine. In this guide, you will learn how to configure and run modern JUnit 5 test suites in Maven and Gradle builds.
How to declare a JUnit 5 Test Suite
Firstly, if you are new to JUnit, we recommend checking this article: JUnit 5 : Step-by-step Tutorial
A JUnit 5 TestSuite enables to run multiple tests together. To aggregate multiple Tests in a TestSuite you can use the following annotations:
- @
SelectPackages– specifies the names of packages for the test suite - @
SelectClasses– specifies the classes for the test suite. They can be located in different packages.
Here is an example TestSuite which uses both annotation to select two Test Classes and a package:
import org.junit.platform.runner.JUnitPlatform;
import org.junit.platform.suite.api.SelectClasses;
import org.junit.platform.suite.api.SelectPackages;
import org.junit.runner.RunWith;


@RunWith(JUnitPlatform.class)
@SelectClasses( { Math1Test.class, Math2Test.class } )
@SelectPackages("com.example.project")
public class TestSuiteDemo {
}
Coding the Test Classes
Next, let’s code the two Java Classes Math1Test and Math2Test which are part of our Test Suite. Let’s begin with Math1Test:
package com.example.project;

import org.junit.jupiter.api.Assertions;
import org.junit.jupiter.api.Test;

public class Math1Test {

    @Test
    public void testAddition() {
        int result = Calculator.add(3, 7);
        Assertions.assertEquals(10, result, "3 + 7 should equal 10");
    }

    @Test
    public void testSubtraction() {
        int result = Calculator.subtract(10, 4);
        Assertions.assertEquals(6, result, "10 - 4 should equal 6");
    }
}
Then, here is Math2Test Class:
package com.example.project;

import org.junit.jupiter.api.Assertions;
import org.junit.jupiter.api.Test;

public class Math2Test {

    @Test
    public void testMultiplication() {
        int result = Calculator.multiply(5, 6);
        Assertions.assertEquals(30, result, "5 * 6 should equal 30");
    }

    @Test
    public void testDivision() {
        double result = Calculator.divide(20, 5);
        Assertions.assertEquals(4.0, result, "20 / 5 should equal 4.0");
    }
}
As you can see, both Test Classes are Testing the Calculator Class which contains all the four basic arithmetic operations:
package com.example.project;


public class Calculator {

    public static int add(int a, int b) {
        return a + b;
    }

    public static int subtract(int a, int b) {
        return a - b;
    }

    public static int multiply(int a, int b) {
        return a * b;
    }

    public static double divide(double a, double b) {
        if (b == 0) {
            throw new IllegalArgumentException("Cannot divide by zero");
        }
        return a / b;
    }
}
Building the Test Suite:
In order to build the project, make sure you include the JUnit 5 BOM File and, besides the Engine and the API, include also the PlatFormRunner which is essential for the JUnit TestSuite:
<dependencyManagement>
	<dependencies>
		<dependency>
			<groupId>org.junit</groupId>
			<artifactId>junit-bom</artifactId>
			<version>5.10.1</version>
			<type>pom</type>
			<scope>import</scope>
		</dependency>
	</dependencies>
</dependencyManagement>
<dependencies>
	<dependency>
		<groupId>org.junit.platform</groupId>
		<artifactId>junit-platform-runner</artifactId>
	</dependency>
	<dependency>
		<groupId>org.junit.jupiter</groupId>
		<artifactId>junit-jupiter-engine</artifactId>
		<scope>test</scope>
	</dependency>
	<dependency>
		<groupId>org.junit.jupiter</groupId>
		<artifactId>junit-jupiter-api</artifactId>
		<scope>test</scope>
	</dependency>
</dependencies>
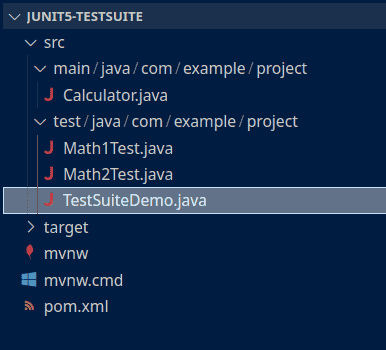
Here is the Project View of our TestSuite:
Running the TestSuite
Switch to the Test perspective of your IDE and execute the TestSuiteDemo Class:
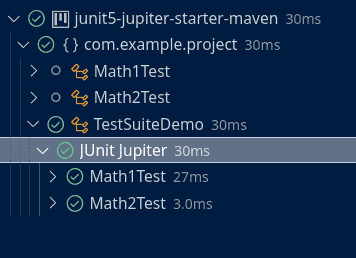
As you can see, the execution of the TestSuiteDemo Class triggered the execution of both Math1Test and Math2Test.
Creating Dynamic Tests with the @TestFactory Annotation
JUnit 5 dynamic tests allow you to declare and execute test cases generated at runtime. Unlike static tests, which define a fixed number of test cases at compile time, dynamic tests enable dynamically defining test cases at runtime.
Dynamic tests can be generated by a method annotated with @TestFactory:
import org.junit.jupiter.api.*;
import org.junit.platform.suite.api.*;

public class DynamicTestSuite {

    @TestFactory
    public TestSuite dynamicTestSuite() {
        return TestSuite.create("Dynamic Test Suite")
                .includePackages("com.example.project")
                .selectClass(MathTest.class)
                .selectClass(MathTest2.class)
                .build();
    }
}
Conclusion:
JUnit 5 Test Suites provide a flexible and powerful way to organize and execute tests in your Java projects. Leveraging advanced features such as conditional execution, test ordering, tags, and parameterized tests enhances the efficiency and readability of test suites.
Source code: https://github.com/fmarchioni/mastertheboss/tree/master/test/junit5-testsuite
Modernizing Legacy JUnit 5 Test Suites
Legacy JUnit 5 tutorials often recommended using @RunWith(JUnitPlatform.class) from JUnit 4 runner bridges. In modern JUnit 5 (5.8 and newer), you should use the standalone @Suite platform annotations instead:
import org.junit.platform.suite.api.SelectClasses;
import org.junit.platform.suite.api.SelectPackages;
import org.junit.platform.suite.api.Suite;

@Suite
@SelectPackages("com.example.project")
@SelectClasses({ Math1Test.class, Math2Test.class })
public class ModernTestSuite {
}
To support @Suite, ensure you include org.junit.platform:junit-platform-suite-engine in your pom.xml test dependencies.
Recommended Articles
Mastering Test Tagging in JUnit 5: Filtering and Executing Tests with Ease
Learn how to tag tests in JUnit 5 using annotations like @Tag. Discover two ways to filter test execution: Maven-Surefire plugin configuration and custom TestSuite class usage.
Create a JUnit 5 Project with IntelliJ IDEA - Step-by-Step Guide
Learn how to create a simple JUnit 5 project using IntelliJ IDEA. Follow our step-by-step guide to set up your Maven project, add a basic class and test it using JUnit.
Unlock JUnit 5 Test Execution in Maven Projects - A Comprehensive Guide
Ensure your JUnit 5 tests run smoothly with this comprehensive guide to resolving common issues.
How to Assert No Exception Thrown in Java with JUnit 4 and JUnit 5
Learn how to assert no exception thrown in Java tests using JUnit 4 and JUnit 5. #Java #JUnit #Testing #CloudNative