Getting started with JUnit and IntelliJ Idea
IntelliJ IDEA provides native support for JUnit 5, making it effortless to write, generate, and run unit tests directly inside your IDE. From automatic test class generation (`Ctrl+Shift+T`) to execution with code coverage analysis, mastering IntelliJ IDEA's testing integration accelerates your Java development workflow. In this tutorial, you will learn how to create a Maven-backed JUnit 5 project, generate test cases, and execute unit tests in IntelliJ IDEA.
Creating an IntelliJ Project:
Requirements: Download IntelliJ Community edition from: https://www.jetbrains.com/idea/download/
Install IntelliJ Idea, then launch it:
- Create a new Project using your favorite framework (e.g. Maven):
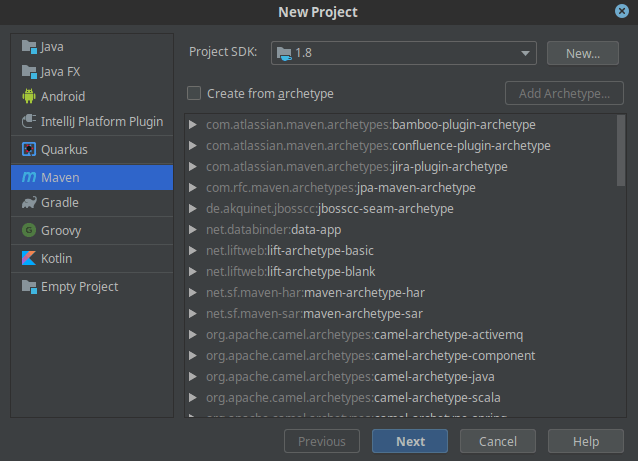
- Fill up the Project coordinates (Group, Artifact, Version)
- Next add a Java Class
Here is our basic class:
public class UnitTestDemo {

    public int sum(int x, int y) {
        return x+y;
    }
}
Next, right-click on your Class and choose “Generate” to generate a Test Class:
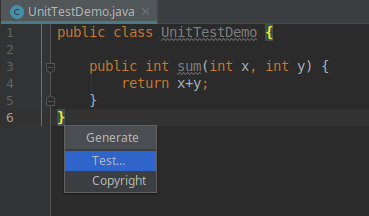
Select the Class name to be generated, the methods to be tested and the testing framework:
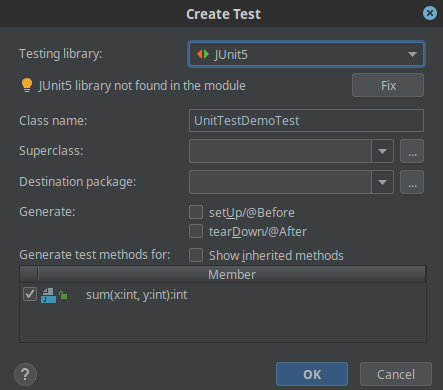
As you can see from the above image, the JUnit library has not been found in your project. Clicking on Fix you can choose where to install the JUnit library.
Here is the generated class:
import static org.junit.jupiter.api.Assertions.*;

class UnitTestDemoTest {

    @org.junit.jupiter.api.Test
    void sum() {
    }
}
Add an example test to verify the sum method:
import static org.junit.jupiter.api.Assertions.*;

class UnitTestDemoTest {

    @org.junit.jupiter.api.Test
    void sum() {
        UnitTestDemo test = new UnitTestDemo();
        assert(test.sum(3,3) == 6);
    }
}
Here is how your JUnit project should look like:
src
├── main
│   ├── java
│   │   └── UnitTestDemo.java
│   └── resources
└── test
    └── java
        └── UnitTestDemoTest.java
And this is the pom.xml used by our project:
<?xml version="1.0" encoding="UTF-8"?>
<project xmlns="http://maven.apache.org/POM/4.0.0"
         xmlns:xsi="http://www.w3.org/2001/XMLSchema-instance"
         xsi:schemaLocation="http://maven.apache.org/POM/4.0.0 http://maven.apache.org/xsd/maven-4.0.0.xsd">
    <modelVersion>4.0.0</modelVersion>

    <groupId>com.example</groupId>
    <artifactId>junitdemo</artifactId>
    <version>1.0-SNAPSHOT</version>
    <dependencies>
        <dependency>
            <groupId>org.junit.jupiter</groupId>
            <artifactId>junit-jupiter-api</artifactId>
            <version>RELEASE</version>
            <scope>test</scope>
        </dependency>
        <dependency>
            <groupId>org.junit.jupiter</groupId>
            <artifactId>junit-jupiter-api</artifactId>
            <version>RELEASE</version>
            <scope>test</scope>
        </dependency>
        <dependency>
            <groupId>org.junit.jupiter</groupId>
            <artifactId>junit-jupiter-api</artifactId>
            <version>RELEASE</version>
            <scope>test</scope>
        </dependency>
        <dependency>
            <groupId>org.junit.jupiter</groupId>
            <artifactId>junit-jupiter-api</artifactId>
            <version>RELEASE</version>
            <scope>test</scope>
        </dependency>
        <dependency>
            <groupId>org.junit.jupiter</groupId>
            <artifactId>junit-jupiter-api</artifactId>
            <version>RELEASE</version>
            <scope>test</scope>
        </dependency>
        <dependency>
            <groupId>org.junit.jupiter</groupId>
            <artifactId>junit-jupiter-api</artifactId>
            <version>RELEASE</version>
            <scope>test</scope>
        </dependency>
        <dependency>
            <groupId>org.junit.jupiter</groupId>
            <artifactId>junit-jupiter-api</artifactId>
            <version>RELEASE</version>
            <scope>test</scope>
        </dependency>
    </dependencies>

</project>
Now right-click on the Test class and check that the Test passed:

Congratulations! You just managed to create your first JUnit 5Project with IntelliJ Idea!
Frequently Asked Questions
What is the keyboard shortcut to generate a test class in IntelliJ IDEA?
Press Ctrl + Shift + T (Windows/Linux) or Cmd + Shift + T (macOS) while viewing a Java class to instantly create or jump to its corresponding test class.
How do I resolve 'JUnit 5 library not found' in IntelliJ IDEA?
Click the 'Fix' button in the Generate Test dialog to let IntelliJ automatically add `org.junit.jupiter:junit-jupiter` to your project dependencies, or declare the dependency in your pom.xml.
Recommended Articles
Create a JUnit 5 TestSuite with Step-by-Step Guide and Practical Examples
Learn how to create a JUnit 5 TestSuite for efficient test execution. Includes annotations and example code.
How to Assert No Exception Thrown in Java with JUnit 4 and JUnit 5
Learn how to assert no exception thrown in Java tests using JUnit 4 and JUnit 5. #Java #JUnit #Testing #CloudNative
Beginner's Guide: Setting Up and Running Your First JUnit 5 Test in Java
Learn how to set up a JUnit 5 project and write your first test with this beginner-friendly guide. #JUnit5 #JavaTesting #CloudNative
Unlock JUnit 5 Test Execution in Maven Projects - A Comprehensive Guide
Ensure your JUnit 5 tests run smoothly with this comprehensive guide to resolving common issues.