Getting started with TestNG
TestNG is a powerful Java testing framework inspired by JUnit, offering flexible test annotations, grouping mechanisms, parallel execution, and built-in data providers. Whether you are running unit tests via Maven Surefire or executing custom test suites from IDEs, TestNG provides robust control over your testing lifecycle. In this getting-started guide, you will learn how to configure TestNG dependencies, write your first test class, and leverage `@DataProvider` for data-driven testing.
What is TestNG?
TestNG is an open source automated testing framework. It has been designed to reduce some of the limitations of JUnit to make it more flexible and powerful. The highlights of TestNG are:
- TestNG supports a wide range of annotations.
- TestNG uses more Java and OO features.
- TestNG supports testing integrated classes (i.e. by default, no need to create a new test class instance for every test method).
- TestNG has a clean separation from compile-time test code and run-time configuration/data info.
- TestNG supports a flexible runtime configuration.
- TestNG introduces the concept of ‘test groups’. Once you have compiled your tests, you can just ask TestNG to run all the “front-end” tests, or “fast”, “slow”, “database” tests, etc.
- TestNG supports Dependent test methods, parallel testing, load testing, and partial failure.
- TestNG has a flexible plug-in API.
- TestNG has support for multi threaded testing.
Setting up Test NG
Let’s write a proof of concept Hello World example with TestNG.
Firstly, we will add to our pom.xml the latest version of Test NG which as of May 2026 it’s the version 7.12.0:
<dependency>
   <groupId>org.testng</groupId>
   <artifactId>testng</artifactId>
   <version>7.12.0</version>
   <scope>test</scope>
</dependency>
On the other hand, if you are using Gradle, you will need the following basic configuration in your build.gradle file:
test { //this is the gradle task to be executed
  useTestNG() { //Tells Gradle to use TestNG
       useDefaultListeners = true // Tells TestNG to execute its default reporting structure
       suites 'src/test/suite.xml' //location of our suite.xml
  }
}
Running TestNG on Eclipse
You can run your Test classes from the Command Line or from your IDE. For example, to run TestNG suites from Eclipse you can install its plug-in which is available in the Eclipse Marketplace:
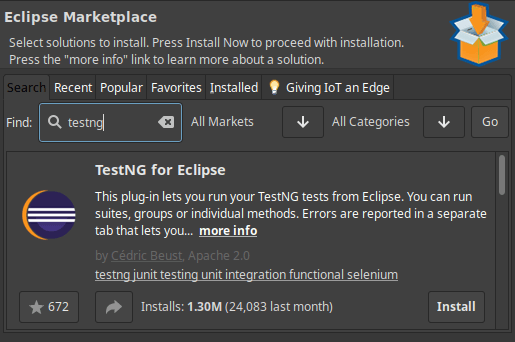
Choose Install and restart Eclipse.
Coding your first TestNG Class
Here is your example App.java file:
public class App {

    public int sum(int a, int b) {
        return a + b;
    }
}
Now let’s test it with TestNG:
import org.testng.Assert;
import org.testng.annotations.Test;

public class AppTest
{
    @Test
    public void helloworld() {
        App a = new App();
        Assert.assertEquals(10, a.sum(5,5));
    }

}
if you have installed Eclipse TestNG plugin, you can simply run the Test by right-clicking on the Class and choosing Run As | TestNG Test. Otherwise, from the command line, run the Maven test goal:
$ mvn testNext, check the output:
PASSED: helloworld

===============================================
    Default test
    Tests run: 1, Failures: 0, Skips: 0
================================================
TestNG annotations order
Much alike JUnit, you can capture Test lifecycle steps using annotations. the Following Test class shows how to intercept the various phases of a TestNG Class:
import org.testng.annotations.Test;
import org.testng.annotations.BeforeMethod;
import org.testng.annotations.AfterMethod;
import org.testng.annotations.BeforeClass;
import org.testng.annotations.AfterClass;
import org.testng.annotations.BeforeTest;
import org.testng.annotations.AfterTest;
import org.testng.annotations.BeforeSuite;
import org.testng.annotations.AfterSuite;

public class SampleTestNGClass {

  @Test
  public void hello() {
      System.out.println("@Test annotation");
  }

  @BeforeMethod
  public void beforeMethod() {
      System.out.println("@BeforeMethod annotation");
  }

  @AfterMethod
  public void afterMethod() {
      System.out.println("@AfterMethod annotation");
  }

  @BeforeClass
  public void beforeClass() {
      System.out.println("@BeforeClass annotation");
  }

  @AfterClass
  public void afterClass() {
      System.out.println("@AfterClass annotation");
  }

  @BeforeTest
  public void beforeTest() {
      System.out.println("@BeforeTest annotation");
  }

  @AfterTest
  public void afterTest() {
      System.out.println("@AfterTest annotation");
  }

  @BeforeSuite
  public void beforeSuite() {
      System.out.println("@BeforeSuite annotation");
  }

  @AfterSuite
  public void afterSuite() {
      System.out.println("@AfterSuite annotation");
  }

}
And here is the execution order for all the above methods:
- BeforeSuite and AfterSuite methods are executed only once.
- BeforeTest and AfterTest methods are executed only once per test class.
- BeforeClass and AfterClass methods are executed only once per class.
- BeforeMethod and AfterMethod methods are executed for all @Test methods.
- If the TestNG class contains more than one methods marked with @BeforeMethod and @AfterMethod, then all the methods are executed before and after every @Test method.
A common question is about the difference between BeforeTest and BeforeMethod. We can summarize it as follows:
- @BeforeTest : It will call only once, before Test method.
- @BeforeMethod It will call every time before Test Method.
When should you use BeforeSuite?
@BeforeSuite is typically used when we have different environment vars to run your test cases. You can set them in a @BeforeSuite annotated method so that before executing all the test cases, you need to load all the environment variables for your framework, and then it starts executing your test cases.
Running the same Test with multiple parameters
One of the most interesting features of TestNG is the ability to run multiple times the same test using a different set of parameters. You can achieve that by defining a method as @DataProvider and having it to return a set of parameters.
See the following example:
import org.testng.Assert;
import org.testng.annotations.DataProvider;
import org.testng.annotations.Test;

public class DataProviderTest {

    @Test(dataProvider = "provideNumbers")
    public void test(int number, int expected) {
        Assert.assertEquals(number + 10, expected);
    }

    @DataProvider(name = "provideNumbers")
    public Object[][] provideData() {

        return new Object[][] {
            { 10, 20 },
            { 100, 110 },
            { 200, 210 },
            { 300, 310 },
            { 400, 210 }
        };
    }

}
The above example runs 5 executions of the same test method, each one with a different couple of parameters.
Common Problems & Solutions
Problem: Maven Surefire skips TestNG tests or executes JUnit tests instead.
Cause: Maven Surefire defaults to JUnit when both testing libraries are present on the classpath without explicit suite XML configuration.
Solution: Configure <suiteXmlFiles> in maven-surefire-plugin or declare TestNG explicitly in your plugin dependencies.
Problem: DataProvider method fails with MethodInvocationException or parameter mismatch.
Cause: The parameter types and count returned by the Object[][] matrix in @DataProvider do not match the target test method signature.
Solution: Ensure the number and types of elements in each row of the data provider match the test method parameter list exactly.
Recommended Articles
Create Your First TestNG Example with Maven and Gradle
Learn how to set up a basic TestNG project using Maven or Gradle in this step-by-step guide.
JUnit 5: Comprehensive Guide to Asserting Exceptions in Tests
Learn how to assert exceptions in JUnit 5 and JUnit4 tests with examples. #JUnit #JavaTesting #CloudNative
Mastering Mockito for Java Applications: Plugging into JUnit and Quarkus Tests
Learn how to integrate Mockito in JUnit and Quarkus tests for effective unit testing. #Mockito #JavaTesting #JUnit #Quarkus
Maximize Test Efficiency with JUnit AssertTimeout: A Comprehensive Guide
Learn how to implement timeout assertions in JUnit tests to ensure timely test execution and prevent lengthy tests from running indefinitely.