How to run Vaadin in Jakarta EE Containers
In this tutorial we will learn how to create a Vaadin Flow project that we can run on any Jakarta EE Container such as WildFly or TomEE. We will start from a starter template and we will adapt it to create a sample Customer Form that binds its fields into the Database.
Setting up the Vaadin Flow Jakarta EE project
Firstly, if you are new to Vaadin Flow, we recommend heading first to this introduction article: Vaadin Tutorial: Building Modern Web Applications with Ease
In order to bootstrap a Vaadin Flow project which contains the right dependencies for a Jakarta EE container (WildFly), you can surf to the project initializer at: https://start.vaadin.com/app
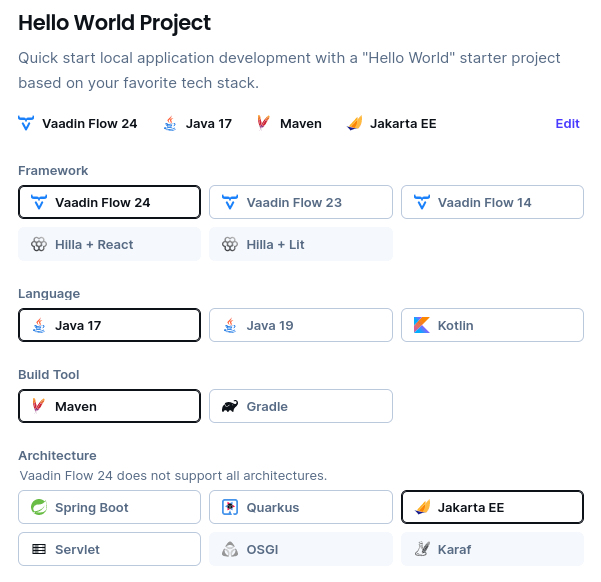
Expand the options by clicking on Edit and choose as Architecture “Jakarta EE“. Then, download the project.
A quick look at the project pom.xml reveals that, besides the Jakarta EE 10 dependencies and the general vaadin dependency, our project contains the vaadin-cdi dependency. This is essential to bridge the world of Vaadin Flow with Jakarta EE that is based on CDI:
<dependency>
    <groupId>jakarta.platform</groupId>
    <artifactId>jakarta.jakartaee-web-api</artifactId>
    <version>10.0.0</version>
    <scope>provided</scope>
</dependency>
<dependency>
    <groupId>com.vaadin</groupId>
    <!-- Replace artifactId with vaadin-core to use only free components -->
    <artifactId>vaadin</artifactId>
</dependency>
<dependency>
    <groupId>com.vaadin</groupId>
    <artifactId>vaadin-cdi</artifactId>
</dependency>
Besides, the project also includes WildFly Maven plugin, therefore will deploy our application to WildFly in a snap.
Coding our Vaadin Flow Route
The built-in project already contains a couple of example Classes:
src
├── main
│   ├── java
│   │   └── org
│   │       └── vaadin
│   │           └── example
│   │               ├── AppShell.java
│   │               ├── GreetService.java
│ │ └── MainView.java- The
AppShellClass is essential for defining and configuring the Progressive Web App aspects of a Vaadin application. It sets up PWA-related metadata and defines the theme to be used for styling UI components across the application. - The
MainViewClass defines a Vaadin Flow Route with a minimal set of Components in it, to print an Hello Message.
In order to customize our project, we will customize the MainView Class. The new implementation will contain a Form with some fields that will be submitted to the back-end Service:
@Route("")
@CdiComponent
public class MainView extends VerticalLayout {

    @Inject
    private CustomerService service;
    private Binder<Customer> binder = new Binder<>(Customer.class);

    @PostConstruct
    public void init() {

        TextField firstName = new TextField("First Name");
        TextField lastName = new TextField("Last Name");
        TextField email = new TextField("Email");
        ComboBox<String> countryComboBox = new ComboBox<>("Country");
        countryComboBox.setItems("USA", "Canada"); // Add your country options here

        binder.bind(firstName, Customer::getFirstName, Customer::setFirstName);
        binder.bind(lastName, Customer::getLastName, Customer::setLastName);
        binder.bind(email, Customer::getEmail, Customer::setEmail);
        binder.bind(countryComboBox, Customer::getCountry, Customer::setCountry);

        Button registerButton = new Button("Register", event -> {

            Customer customer = new Customer();
            binder.writeBeanIfValid(customer);
            service.register(customer);

            // Perform registration logic here
            String message = "Registration successful for: " +
                    firstName.getValue() + " " +
                    lastName.getValue() + ", Email: " +
                    email.getValue();
            Notification.show(message);
            // Clear all fields after registration is completed
            binder.removeBean(); // Remove current bean from the binder
            binder.setBean(new Customer()); // Set a new instance of Customer to the binder
        });


        registerButton.addThemeVariants(ButtonVariant.LUMO_PRIMARY);
        registerButton.addClickShortcut(Key.ENTER);

        addClassName("centered-content");
        add(firstName, lastName, email, countryComboBox, registerButton);
    }

}
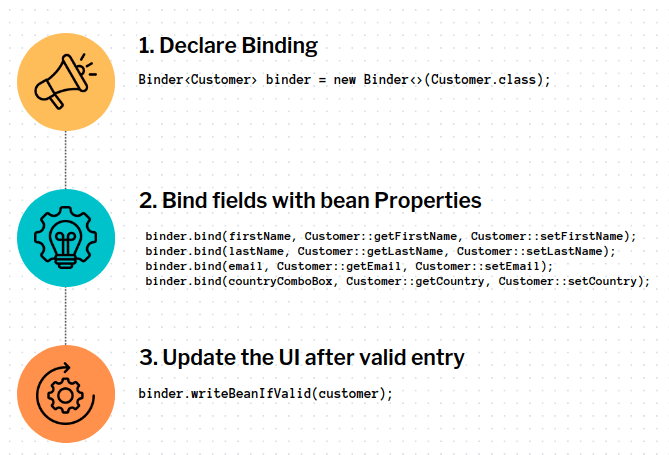
The most interesting addition is the use of the Binder Class. The Binder class in Vaadin is a crucial component used for binding data between UI components and Java objects. It plays a pivotal role in simplifying the process of synchronizing and validating data entered in UI components (like text fields, checkboxes, etc.) with corresponding data objects in Java.
In our example, by executing binder.writeBeanIfValid(customer), we copy the Form Components in a new Customer Object.
Here is the Customer definition:
@Entity
public class Customer {

    @Id
    @GeneratedValue(strategy = GenerationType.IDENTITY)
    private Long id;
    private String firstName;
    private String lastName;
    private String email;
    // Getters / setters
}
Finally, once that we have all Customer properties in place, we can call the service.register(customer) that will persist the Customer in the Database:
@ApplicationScoped
public class CustomerService {
    @PersistenceContext
    EntityManager em;

    @Transactional
    public void register(Customer customer) {
        em.persist(customer);
    }
}
Running our Flow
Since the WildFly plugin is available, we can start WildFly and deploy the application as follows:
mvn install wildfly:deployThe application will register on the root Web Context. Therefore we can access it at: http://localhost:8080:
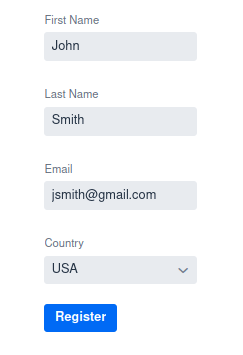
You can experiment, by filling up the Form and clicking on the Register button. Verify that the operation completes successfully. For the sake of brevity, we didn’t discuss here the persistence.xml configuration of our application which uses just the H2 database. You can check the full source code at the end of this article.
Fixing the Error NoClassDefFoundError: com/sun/nio/file/ExtendedWatchEventModifier
By deploying the Vaadin starter on WildFly 30, I have hit the following error:
19:54:47,193 ERROR [com.vaadin.base.devserver.FileWatcher] (ForkJoinPool.commonPool-worker-18) Error starting file watcher: java.lang.NoClassDefFoundError: com/sun/nio/file/ExtendedWatchEventModifierAs discussed in this issue, this is related to a defect in the File Watcher when you are deploying a multi module project on WildFly. Until the issue is fixed, the workaround is to is to add com.sun.nio.file as a dependency.
Therefore, add the following configuration to your maven.war.plugin:
<plugin>
        <groupId>org.apache.maven.plugins</groupId>
        <artifactId>maven-war-plugin</artifactId>
        <configuration>
            <archive>
                <manifestEntries>
                    <Dependencies>jdk.unsupported</Dependencies>
                </manifestEntries>
            </archive>
        </configuration>
</plugin>
Conclusion
This article was a complete walkthrough the set up and creation of a complete Vaadin Flow project. We have covered the key aspects related to the creation of a Form with some components and how to bind them so that we can use as DTO for a Service Class. We also have discussed how to fix an issue related to the deployment on WildFly of the Vaadin Flow Jakarta EE project.
Source code: https://github.com/fmarchioni/mastertheboss/tree/master/web/vaadin/jakartaee
Recommended Articles
Optimizing JVM Memory Settings in Java Applications Running in Docker Containers
Ensure your Java app runs smoothly with proper JVM memory settings. Learn about default limits and how to specify values for better control.
Run Containers without Docker: Get Started with Podman
Learn how to run Linux containers and deploy WildFly application server using Podman, a container runtime that doesn't require a daemon to run on your system.
Effortlessly Manage PostgreSQL Database with Docker Containers - A Comprehensive Guide
Learn how to quickly start and manage a PostgreSQL database using Docker containers in this comprehensive guide.
Monitor WildFly Container Image with JVisualVM | Enterprise Java Tutorials
Learn how to monitor a Docker Container image of WildFly using JVisualVM in this tutorial.