Introduction to Keycloak (2026)
Keycloak is an Identity and Access Management Server for Modern Applications and Services. In this updated Keycloak tutorial we will learn how to set up Keycloak and configure it to authenticate/authorize an Enterprise application running on WildFly.
Keycloak update (2026)
Keycloak today ships as a single distribution:
- Quarkus distribution — the only distribution actively developed and supported, running on the Quarkus runtime. To learn more about managing Keycloak with Quarkus, we recommend checking also this article: Getting started with Keycloak powered by Quarkus
The older WildFly-based "legacy" server distribution mentioned in previous versions of this article was deprecated in 2022 and formally removed starting with Keycloak 20. If you are still running a WildFly-based Keycloak server today, it is well past end-of-life and should be migrated to a current Quarkus-based release (currently 26.7.0) as soon as possible — see our Keycloak with Docker and Docker Compose guide for a quick way to stand up a current instance.
First of all, download the latest stable build of Keycloak from https://www.keycloak.org/downloads (the older keycloak.jboss.org download page no longer exists).
Then, unzip the distribution in a folder of your drive. In the next section, we will start and configure a Keycloak Realm.
Starting Keycloak
Firstly, we will start Keycloak with an offset of 100 in order to avoid conflicts with existing services running on port 8080 (for example a WildFly server). With the current Quarkus-based distribution, you can start it as follows:
./kc.sh start-dev --http-port=8180On Windows, use kc.bat start-dev --http-port=8180 instead. If you are working with an old, already-installed WildFly-based Keycloak server (pre-20, unsupported), the equivalent legacy start command was:
./standalone.sh -Djboss.socket.binding.port-offset=100Next, log into Keycloak Administration Console, available at: http://localhost:8180
In your first Login, you will be requested to create an administration user:

Then, login with the admin user credentials from the previous step:

Great. We are now ready to define our first Keycloak Realm.
What is Keycloak default admin password?
Keycloak does not have a default password for the admin account. As said, when you first create an instance of Keycloak, you will need to set an initial password for the admin account (or provide it via the KC_BOOTSTRAP_ADMIN_USERNAME / KC_BOOTSTRAP_ADMIN_PASSWORD environment variables when running Keycloak in a container). It is important to set a strong, unique password for the admin account to secure your Keycloak server. To learn how to reset the Admin Password for the default H2 Database, check this article: How to access Keycloak H2 Database
Create your Realm, Roles, Users and a Client
The core concept in Keycloak is a Realm. A realm secures and manages security metadata for a set of users, applications, and registered OAuth clients. Users can be created within a specific realm within the Administration console. Roles (permission types) can be defined at the realm level and you can also set up user role mappings to assign these permissions to specific users.
1) Create a Realm
First, create a new Realm by clicking on the Create Realm button, located on the left side bar:

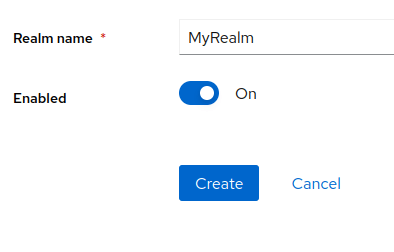
Next, enter the Realm Name, for example MyRealm and click on Create:
2) Create a Role
Then, we will define a Role. The Role will be used by your applications to define which users will be authorized to access the application. Click on the "Realm roles" left link and choose "Create role":

Your Realm now includes the Role "Manager". Our application will allow only Users with this Role.
3) Create a User
So far we don't have any User, besides the admin user. We will create another User for our application. Click on the "Users" left option and choose to Add a new User:
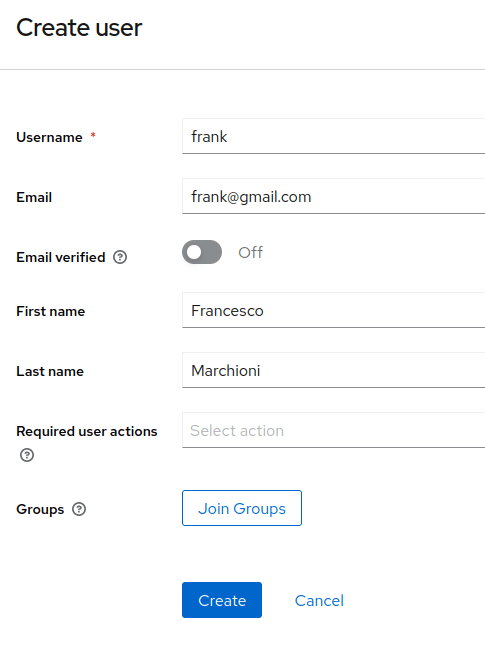
The User named "frank" will be added by clicking on Save. Now select the User from the list: we need to perform two actions on it.

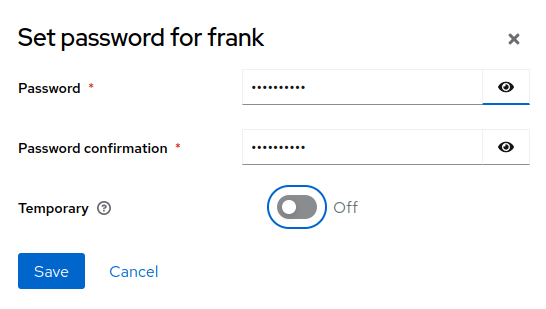
The first one will be setting a password for it so click on Credentials and set a new Password for the user:
4) Assign a Role to the User
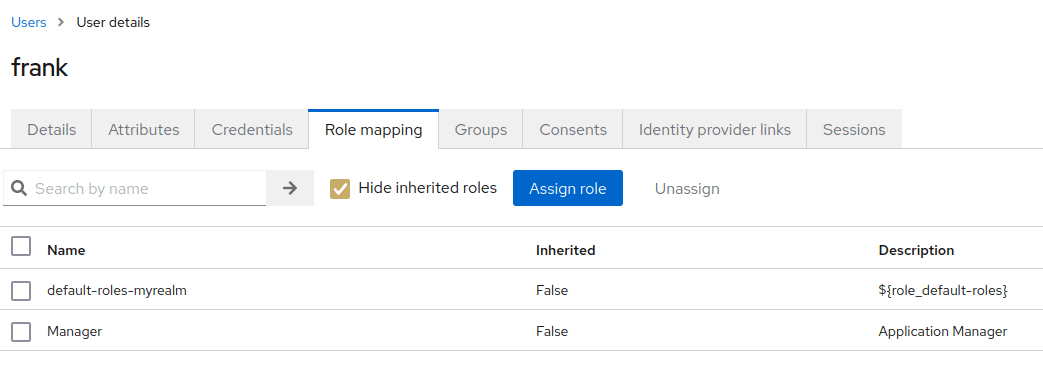
Finally, we will include the User as part of the Manager Role. Click on Users | User details | Role Mappings Tab and assign the User to the Manager Role by selecting the Manager Role and clicking on Assign:
5) Create a new Client
A Keycloak Client is an application that will authenticate with the Keycloak Identity Server. Therefore, our next step will be to define a new Client by clicking on the "Clients" link on the left:
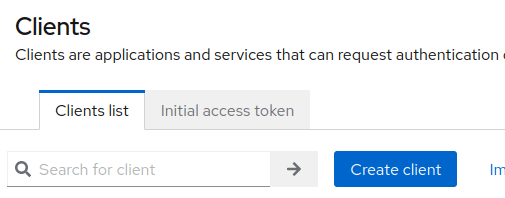
Choose to Create client. The most important settings are the following ones:
In the General Settings, configure:
- Client ID which specifies the ID referenced in URIs and tokens.
- Keycloak Client Root URL, which is the base URL of the Keycloak client application. It is typically used as a base URL for redirecting users to Keycloak for authentication, or for making API calls to the Keycloak server.
- Keycloak Client Valid Redirect URL, which is a URL that the Keycloak server uses to redirect the user after successful authentication.
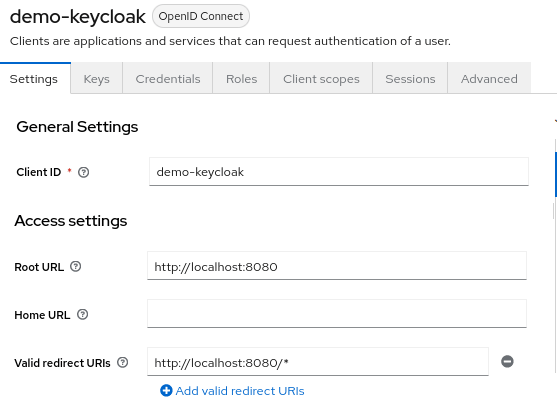
Then, in the Capability config, enable Client Authentication:
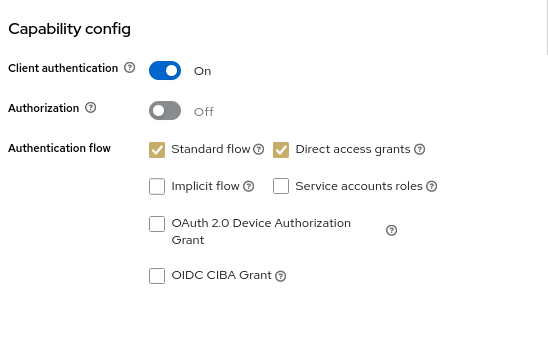
Before moving to the last step, it is essential that we understand what is the effect of enabling/disabling the options available in the Capability Config panel:
- 🔐 Client Authentication: Enables confidential client mode: the client must authenticate using a client ID and secret or certificate (used for token exchanges, service calls, etc.). If disabled, the client is considered public, and no authentication is required.
- 🛡️ Authorization: Activates Keycloak Authorization Services, allowing the client to use fine-grained authorization policies (RBAC, ABAC) using Keycloak's permission model. Often used in resource servers.
- 🔁 Authentication flow: Standard Flow: Enables the Authorization Code Flow (OAuth 2.0), suitable for browser-based clients (e.g., web apps). Redirects users to Keycloak for login, then exchanges a code for tokens.
- 🧾 Authentication flow: Direct Access Grants: Enables the Resource Owner Password Credentials Grant, where the client directly exchanges username and password for a token (no browser involved). Useful for CLI or legacy apps. Less secure, often discouraged, and considered deprecated by the OAuth 2.0 Security Best Current Practice.
- 🌐 Authentication flow: Implicit Flow: Enables the Implicit Flow (deprecated), where tokens are returned directly via redirect without a code exchange. Historically used by pure frontend apps (e.g., SPAs), but no longer recommended — modern SPAs should use the Authorization Code Flow with PKCE instead.
- 🤖 Authentication flow: Service Account Roles: Allows the client to act as a machine-to-machine user using a service account, authenticated via client credentials. Roles are assigned to the service account, not a user. Common in backend integrations.
Next, click on Save.
The last step is to export Keycloak OIDC details as a JSON String. You can do that from the Clients perspective, click on the Action | Download adapter configs:
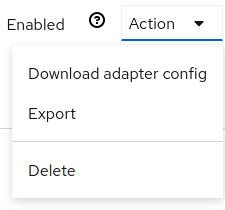
In the Download window, choose to generate a JSON OIDC code for your application:
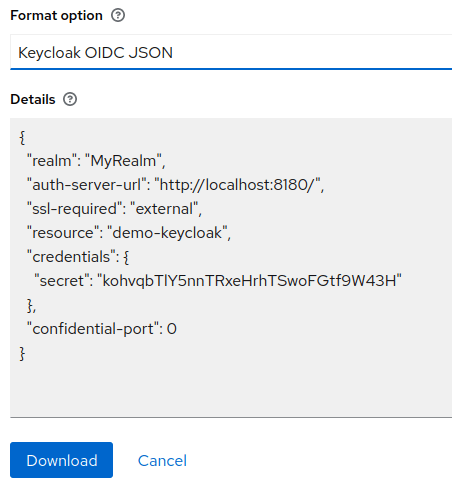
Download the JSON or simply copy it in an editor, we will use it in a minute.
Installing the OIDC JSON File in Your Applications
If you are using WildFly 25 or newer — which includes all currently supported WildFly releases — testing the application is quite simple, as WildFly can authenticate against Keycloak OIDC natively via the Elytron OIDC client. If you are running a genuinely old application server version, skip to the next section "Installing Keycloak adapter on WildFly (deprecated)".
To authenticate against the Keycloak Realm, save the keycloak.json file as oidc.json in the WEB-INF folder of your application. For example:
src
└── main
    ├── java
    │   └── com
    │       └── mastertheboss
    │           └── servlet
    │               └── SecuredServlet.java
    └── webapp
        └── WEB-INF
            ├── oidc.json
            └── web.xml
Then, in the web.xml, specify OIDC as the Authentication Method:
<login-config>
    <auth-method>OIDC</auth-method>
</login-config>
Finally, add a SecurityConstraint in your Web application which requires the Manager Role:
@WebServlet("/secured")
@ServletSecurity(httpMethodConstraints = {
    @HttpMethodConstraint(value = "GET", rolesAllowed = { "Manager" })
})
public class SecuredServlet extends HttpServlet {

    @Override
    protected void doGet(HttpServletRequest req, HttpServletResponse resp)
            throws ServletException, IOException {
        try (PrintWriter writer = resp.getWriter()) {
            writer.println("<html>");
            writer.println("  <head><title>Secured Servlet</title></head>");
            writer.println("  <body>");
            writer.println("    <h1>Secured Servlet</h1>");
            writer.println("    <p>");
            writer.print(" Current Principal '");
            Principal user = req.getUserPrincipal();
            writer.print(user != null ? user.getName() : "NO AUTHENTICATED USER");
            writer.print("'");
            writer.println("    </p>");
            writer.println("  </body>");
            writer.println("</html>");
        }
    }

}
You can deploy the application on WildFly with:
mvn install wildfly:deployWhen you try to reach the /secured Servlet, you will be redirected to the Keycloak authentication page. Upon successful authentication, you will be able to access the Secured Servlet, which prints the current Role:
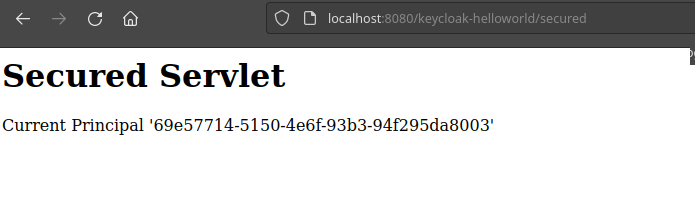
Source code for this application: https://github.com/fmarchioni/mastertheboss/tree/master/keycloak/helloworld
Running the Secured WildFly Application as a Bootable JAR
You can also bootstrap your application as a Bootable JAR, which is a recommended pattern to run the application as a Secured Microservice. Turning your application into a Bootable JAR is even easier when using WildFly Glow. You can read more about WildFly Glow in this article: WildFly Glow: Next-Gen Evolution in Provisioning
As a matter of fact, the wildfly-glow utility will automatically detect the layers you are using in your application and bind it to the latest WildFly feature pack:
wildfly-glow scan /path/keycloak-helloworld.war --provision=BOOTABLE_JAR

context: bare-metal
enabled profile: none
galleon discovery
- feature-packs
   org.wildfly:wildfly-galleon-pack:40.0.0.Final
- layers
   ee-core-profile-server
   elytron-oidc-client
As you can see in our example, besides the ee-core-profile-server, we are adding the elytron-oidc-client layer, which contains the Elytron OIDC extension used to connect to Keycloak.
You can then run your Bootable JAR application with:
java -jar keycloak-helloworld-40.0.0.Final-bootable.jarInstalling Keycloak Adapter for WildFly (deprecated)
⚠️ Historical reference only
The Keycloak client adapters described in this section (the standalone adapter ZIP, the keycloak JBoss subsystem, and the CLI installer scripts) were deprecated with Keycloak 19 and fully removed from the Keycloak project starting with Keycloak 22. They no longer exist as downloadable artifacts on current Keycloak releases. This section is kept only for readers still maintaining very old Keycloak/WildFly combinations; for any current deployment, use the native OIDC support described in the previous section instead (Elytron oidc-client, available since WildFly 25+).
The second part of this tutorial discusses how these older adapter-based integrations used to work on legacy WildFly versions, for historical and migration context.
- The first option consisted in adding the Keycloak JSON file within your Web application and specifying in web.xml that you would be using KEYCLOAK Auth.
- The second option consisted in configuring WildFly's Keycloak subsystem with the list of applications that would use KEYCLOAK Auth.
- The third option allowed downloading a CLI command to run on WildFly to enable Keycloak Authentication/Authorization for a specific deployment unit.
Keycloak Security in the Web Application (legacy)
Create a Web application that exposes the "/hello" URL and include within the web.xml file a security-constraint bound to the "Manager" Role. Also include as authentication mechanism "KEYCLOAK", which is not a standard Jakarta EE authentication mechanism, hence it required a patched application server as described above:
<web-app xmlns="http://java.sun.com/xml/ns/javaee"
         xmlns:xsi="http://www.w3.org/2001/XMLSchema-instance"
         xsi:schemaLocation="http://java.sun.com/xml/ns/javaee http://java.sun.com/xml/ns/javaee/web-app_3_0.xsd"
         version="3.0">

    <module-name>basicauth</module-name>

    <security-constraint>
        <web-resource-collection>
            <url-pattern>/*</url-pattern>
        </web-resource-collection>
        <auth-constraint>
            <role-name>Manager</role-name>
        </auth-constraint>
    </security-constraint>

    <login-config>
        <auth-method>KEYCLOAK</auth-method>
        <realm-name>MyRealm</realm-name>
    </login-config>

    <security-role>
        <role-name>Manager</role-name>
    </security-role>
</web-app>
Next, you would add, in the WEB-INF folder, a keycloak.json file containing the JSON descriptor generated earlier:
{
   "realm": "MyRealm",
   "auth-server-url": "http://localhost:8180/auth",
   "ssl-required": "external",
   "resource": "demo-keycloak",
   "credentials": {
      "secret": "86f1644f-b686-4011-8c05-31ca7245f94a"
   },
   "confidential-port": 0
}
Save and deploy the application. If you try to access your application at localhost:8080/hello the Keycloak login authentication UI will prompt:
Enter your User's credentials with the "Manager" Role and verify that you can access the pages contained in your application.
Plugging Keycloak Security into WildFly (XML, legacy)
This option had the advantage that it could be applied without changing the content of your Web application. It required accessing the XML Configuration of your WildFly Application Server.
From the Keycloak Clients Panel, you would select the Installation Tab and pick, in the Format Option, "Keycloak OIDC JBoss Subsystem XML", as you can see from this picture:

Next, you would copy the XML template from the Installation page and paste it into the standalone.xml file that resides in the standalone/configuration directory of the application server instance on which your application is deployed.
You would open the standalone/configuration/standalone.xml file (or the one in use) and search for the following text:
<subsystem xmlns="urn:jboss:domain:keycloak:1.1"/>Then paste the XML in the subsystem and replace the secure-deployment name with the application name.
Plugging Keycloak Security into WildFly (CLI, legacy)
Finally, the last option available was the Format Option "Keycloak OIDC JBoss Subsystem CLI", as you can see from this picture:
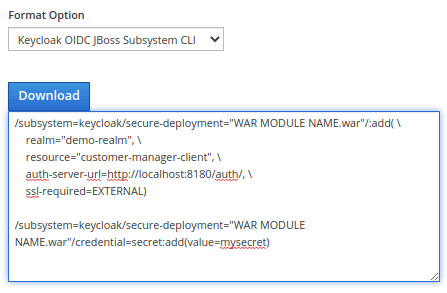
Historically this was considered the recommended choice for automating deployments, for example when creating a MicroService with a WildFly Bootable JAR, where the server configuration includes custom CLI commands to run at start. On current WildFly versions, the same outcome is achieved more simply through the elytron-oidc-client Galleon layer shown earlier, without needing the removed adapter CLI scripts, for example:
$ cd bin
$ ./jboss-cli.sh --file=adapter-elytron-install-offline.cli
This script makes the appropriate edits to the standalone/configuration/standalone.xml file of your app server distribution, enabling the Elytron OIDC client without relying on any deprecated Keycloak adapter.
Keycloak in Production, Kubernetes and OpenShift
Once you're past this local, single-node introduction, moving Keycloak toward production raises a different set of concerns:
- Run the Quarkus distribution behind a reverse proxy or Ingress/Route with TLS terminated at the edge, and set
--hostnameand--proxy-headersexplicitly so issued tokens and redirect URIs stay consistent. - Use an external, production-grade database (PostgreSQL is the most common choice) instead of the embedded dev-mode database, with automated backups.
- Deploy with the official Keycloak Operator on Kubernetes/OpenShift rather than hand-written manifests, so upgrades, TLS, and realm imports are managed declaratively via the
KeycloakandKeycloakRealmImportcustom resources. - Externalize secrets (admin credentials, database passwords, client secrets) through Kubernetes Secrets or a vault solution, never as plain environment variables baked into images.
- Wire up health and metrics endpoints (
/health,/metrics) to your liveness/readiness probes and observability stack, and monitor certificate expiry proactively.
For a hands-on walkthrough of running Keycloak in containers, see our dedicated guide: Keycloak with Docker and Docker Compose.
Frequently Asked Questions
Is the WildFly-based Keycloak server distribution still available?
No. The legacy WildFly-powered Keycloak server distribution was deprecated in 2022 and fully removed starting with Keycloak 20. Since then, Keycloak ships only as a Quarkus-based distribution. Note this refers to the Keycloak server itself — WildFly can still act as a client application that authenticates against Keycloak via native OIDC support.
What is the current Keycloak version?
As of July 2026, the latest Keycloak release is 26.7.0. Keycloak has no separate LTS branch: only the newest minor version receives active security fixes, so plan upgrades accordingly rather than staying on an old release long-term.
Do I still need a Keycloak adapter to secure a WildFly application?
No. Client adapters were deprecated in Keycloak 19 and removed entirely by Keycloak 22. Current WildFly releases (25 and newer, which includes all currently supported versions) authenticate against Keycloak natively via the elytron-oidc-client subsystem/Galleon layer — no separate adapter download is required.
What is the difference between a Realm, a Client, and a Role in Keycloak?
A Realm is an isolated security domain that manages its own users, credentials, roles, and clients. A Client is an application registered to authenticate through that realm (e.g., your WildFly app). A Role is a permission label you define at the realm (or client) level and assign to users, which your application then checks to authorize access.
Should I enable Direct Access Grants or the Implicit Flow for my client?
Generally no for new applications. Direct Access Grants (Resource Owner Password Credentials) and the Implicit Flow are both discouraged by current OAuth 2.0 security best practices. Prefer the Authorization Code Flow (Standard Flow), adding PKCE for public/SPA clients, and reserve Direct Access Grants only for trusted first-party CLI tools where no better alternative exists.
Can I run Keycloak in Docker instead of unzipping the distribution locally?
Yes, and for most people it's the faster path. See our companion guide, Keycloak with Docker and Docker Compose, for development-mode, PostgreSQL-backed, and realm-import setups you can start with a single command.
How do I reset the Keycloak admin password if I forget it?
If you're using the default embedded H2 database, see our dedicated guide: How to access Keycloak H2 Database. For an external database (recommended for production), you can also create a new temporary admin user via the kc.sh bootstrap-admin command or by connecting directly to the configured database.
Is OIDC or SAML the better choice for securing a new application with Keycloak?
For most new web, mobile, and API-based applications, OIDC (built on OAuth 2.0) is the recommended choice — it's simpler to implement, has broader client library support, and is what Keycloak's own WildFly integration and adapters have standardized on. SAML remains relevant mainly for integrating with older enterprise systems and identity providers that only support it.
Recommended Articles
Keycloak Tutorial: Configuring Realm and Using WildFly as OpenID Client - Version 20
Learn how to configure a Keycloak Realm and use WildFly as an OpenID client. Includes terms like OAuth, OpenID Connect.
Securing a MicroProfile Application with Keycloak 26.0.0
Learn how to secure your MicroProfile application running with Thorntail runtime and Keycloak, including setting up realms, roles, users, and client policies.
Configuring Keycloak Database with WildFly and MySQL
Learn how to configure a local Keycloak Identity Provider with a Database using WildFly 31 and MySQL, including database schema creation and JPA datasource configuration.
Keycloak Custom Provider Development Guide for Enterprise Java Developers
Learn how to develop and integrate a custom Keycloak provider in your enterprise environment using latest Java versions.