Keycloak with Spring Boot Applications: Step-by-Step Guide
In this tutorial, you will learn how to secure a Spring Boot application using Keycloak and JWT tokens. We will walk through how to quickly set up a Keycloak server and configure a Spring Boot application to authenticate and authorize users via Keycloak. This comprehensive guide is ideal for developers looking to integrate robust, enterprise-grade authentication into their Spring Boot applications.
Prerequisites
Before starting, ensure you have the following installed:
- Java 17 or later
- Maven 3.8+
- Docker (optional, if you prefer running Keycloak in a container)
- Keycloak 22 or later (self-hosted or Docker image)
- Basic understanding of Spring Boot and OAuth2 concepts
Step 1: Setting Up Keycloak
To run this example, we will configure a local Keycloak server with a custom Realm called “ApplicationRealm”.
1.1 Download and Install Keycloak
You can download Keycloak from the official Keycloak website or use Docker to run it quickly:
docker run -p 8080:8080 -e KEYCLOAK_ADMIN=admin -e KEYCLOAK_ADMIN_PASSWORD=admin quay.io/keycloak/keycloak:latest start-devIn this example, we will use the following Keycloak Configuration:
- Admin credentials:
admin/admin - Application Realm:
ApplicationRealm - Client ID:
my-client - User:
user1/123456(with role “admin”)
To learn more about using Keycloak with Docker check this tutorial: Keycloak Using Docker and Docker Compose (2025 Edition)
1.2 Configure Keycloak via CLI
You can automate the configuration using the Keycloak Admin CLI (kcadm.sh):
#Authenticate with the Admin Server
./kcadm.sh config credentials --server http://localhost:8080 --realm master --user admin --password admin

#Create Realm ApplicationRealm
./kcadm.sh create realms -s realm=ApplicationRealm -s enabled=true -o

#Create User user1
./kcadm.sh create users -r ApplicationRealm \
  -s username=user1 \
  -s enabled=true \
  -s email="joe@gmail.com" \
  -s emailVerified=true \
  -s firstName=Joe \
  -s lastName=Doe


#Set user1 password
./kcadm.sh set-password -r ApplicationRealm --username user1 --new-password 123456

#Create Client
./kcadm.sh create clients -r ApplicationRealm -s clientId=my-client -s bearerOnly="false" -s "redirectUris=[\"http://localhost:8180/*\"]" -s enabled=true -s directAccessGrantsEnabled=true -s clientAuthenticatorType=client-secret -s secret=mysecret

#Create Role customer-manager
./kcadm.sh create roles -r ApplicationRealm -s name=admin

#Assign Role to user1
./kcadm.sh add-roles --uusername user1 --rolename admin -r ApplicationRealm
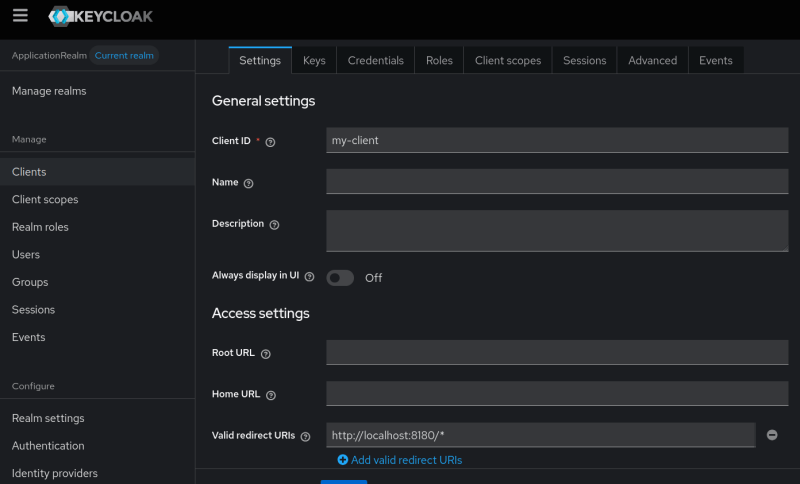
This script will configure your realm, user, client, and roles automatically, saving a lot of time for future deployments. Check that your Keycloak Client and Realms are up and running:
Step 2: Configuring the Spring Boot Application
Now let’s set up our Spring Boot application to use Keycloak for authentication.
2.1 Add Dependencies
Add the following dependencies to your pom.xml:
<dependency>
	<groupId>org.springframework.boot</groupId>
	<artifactId>spring-boot-starter-oauth2-resource-server</artifactId>
</dependency>
<dependency>
	<groupId>org.springframework.boot</groupId>
	<artifactId>spring-boot-starter-security</artifactId>
</dependency>
<dependency>
	<groupId>org.springframework.boot</groupId>
	<artifactId>spring-boot-starter-web</artifactId>
</dependency>
Make sure you’re using the latest Spring Boot version as parent:
<parent>
	<groupId>org.springframework.boot</groupId>
	<artifactId>spring-boot-starter-parent</artifactId>
	<version>3.4.5</version>
	<relativePath/> <!-- lookup parent from repository -->
</parent
Step 3: Coding the Spring Boot Application
Let’s create a basic REST API with secured endpoints.
3.1 Create the Controller
@RestController
@RequestMapping("/api")
public class ControllerHello{

    @GetMapping("/hello")
    public ResponseEntity<String> sayHello() {
        return ResponseEntity.ok("Hello");
    }

    @GetMapping("/admin")
    public ResponseEntity<String> sayHelloToAdmin() {
        return ResponseEntity.ok("Hello Admin");
    }

    @GetMapping("/user")
    public ResponseEntity<String> sayHelloToUser() {
        return ResponseEntity.ok("Hello User");
    }
}
This controller simply defines three endpoints: one public (/hello), and two secured (/admin and /user).
3.2 Set Up the Security Configuration
Here is the SecurityFilterChain which authorizes the REST Endpoints:
@RequiredArgsConstructor
@Configuration
@EnableWebSecurity
public class SecurityConfig {

    public static final String ADMIN = "admin";
    public static final String USER = "user";
    private final JwtConverter jwtConverter;
    @Bean
    public SecurityFilterChain securityFilterChain(HttpSecurity http) throws Exception {
        http.authorizeHttpRequests((authz) ->
                authz.requestMatchers(HttpMethod.GET, "/api/hello").permitAll()
                .requestMatchers(HttpMethod.GET, "/api/admin/**").hasRole(ADMIN)
                .requestMatchers(HttpMethod.GET, "/api/user/**").hasRole(USER).requestMatchers(HttpMethod.GET,
                                "/api/admin-and-user/**").hasAnyRole(ADMIN,USER)
                .anyRequest().authenticated());

        http.sessionManagement(sess -> sess.sessionCreationPolicy(
                SessionCreationPolicy.STATELESS));
        http.oauth2ResourceServer(oauth2 -> oauth2.jwt(jwt -> jwt.jwtAuthenticationConverter(jwtConverter)));

        return http.build();
    }

}
To complete the application, we also need a Class JwtConverter which implements Converter . You can find the full source code at the end of this article.
Step 4: Configuring Keycloak Integration
Now configure your application.properties to point to the Keycloak server:
server.port=8180

spring.application.name=KeycloakSpringBootApplication

# Security Configuration
# Specifies the URI of the token issuer (Keycloak realm) for validating JWT tokens.
spring.security.oauth2.resourceserver.jwt.issuer-uri=http://localhost:8080/realms/ApplicationRealm

# Specifies the URI to retrieve the JSON Web Key Set (JWKS) from the issuer, used to verify the JWT signature.
spring.security.oauth2.resourceserver.jwt.jwk-set-uri=${spring.security.oauth2.resourceserver.jwt.issuer-uri}/protocol/openid-connect/certs

# JWT Configuration
# Defines the resource ID that the JWT auth converter should validate against.
jwt.auth.converter.resource-id=my-client

# Specifies the attribute in the JWT that contains the principal (user identifier).
jwt.auth.converter.principal-attribute=principal_username


# Logging Configuration
logging.level.org.springframework.security=DEBUGNote: Adjust the principal-attribute depending on what claim you want to use (like sub, email, or preferred_username).
Step 5: Testing the Application
5.1 Start Your Spring Boot Application
Use Maven to build and run the application:
mvn clean install spring-boot:runThe application will be available at http://localhost:8180.
5.2 Authenticate and Call the API
Here’s a sample Java client to retrieve a token and access a secured endpoint:
public class SimplePostRequestSecret {

    public static void main(String[] args) {
        String tokenUrl = "http://localhost:8080/realms/ApplicationRealm/protocol/openid-connect/token";
        String apiUrl = "http://localhost:8180/api/admin";

        String grantType = "password";
        String clientId = "my-client";
        String clientSecret = "mysecret"; // Keycloak client secret
        String username = "user1";  // only user1 authorized
        String password = "123456";

        try {
            // Prepare form data
            Map<Object, Object> data = new HashMap<>();
            data.put("grant_type", grantType);
            data.put("client_id", clientId);
            data.put("client_secret", clientSecret); // Add client secret to the form data
            data.put("username", username);
            data.put("password", password);

            String form = data.entrySet()
                    .stream()
                    .map(entry -> entry.getKey() + "=" + URLEncoder.encode(entry.getValue().toString(), StandardCharsets.UTF_8))
                    .collect(Collectors.joining("&"));

            // Create HttpClient
            HttpClient client = HttpClient.newHttpClient();

            // Create HttpRequest for POST to get the token
            HttpRequest tokenRequest = HttpRequest.newBuilder()
                    .uri(URI.create(tokenUrl))
                    .header("Content-Type", "application/x-www-form-urlencoded")
                    .POST(HttpRequest.BodyPublishers.ofString(form))
                    .build();

            // Send the POST request
            HttpResponse<String> tokenResponse = client.send(tokenRequest, HttpResponse.BodyHandlers.ofString());
            System.out.println("POST Response Code :: " + tokenResponse.statusCode());

            if (tokenResponse.statusCode() == 200) { // success
                String responseBody = tokenResponse.body();
                System.out.println("Response Body: " + responseBody);

                // Parse JSON response
                ObjectMapper mapper = new ObjectMapper();
                JsonNode rootNode = mapper.readTree(responseBody);
                JsonNode accessTokenNode = rootNode.path("access_token");
                String token = accessTokenNode.asText();

                if (!accessTokenNode.isMissingNode()) {
                    System.out.println("Access Token: " + token);

                    // Create HttpRequest for GET to access the secured endpoint
                    HttpRequest apiRequest = HttpRequest.newBuilder()
                            .uri(URI.create(apiUrl))
                            .header("Authorization", "Bearer " + token)
                            .GET()
                            .build();

                    // Send the GET request
                    HttpResponse<String> apiResponse = client.send(apiRequest, HttpResponse.BodyHandlers.ofString());
                    System.out.println("GET Response Code :: " + apiResponse.statusCode());

                    if (apiResponse.statusCode() == 200) { // success
                        System.out.println("GET Response: " + apiResponse.body());
                    } else {
                        System.out.println("GET request not worked");
                        System.out.println("Error Response: " + apiResponse.body());
                    }
                } else {
                    System.out.println("Response: " + responseBody);
                }
            } else {
                System.out.println("POST request not worked");
                System.out.println("Error Response: " + tokenResponse.body());
            }
        } catch (Exception e) {
            e.printStackTrace();
        }
    }
}
This HTTP client will:
- Authenticate the user via Keycloak and retrieve a JWT token.
- Access the
/api/adminendpoint using the token.
You can also use Postman or cURL to test the endpoints manually.
Conclusion
In this guide, you learned how to:
- Set up a Keycloak server.
- Secure a Spring Boot REST API using JWT tokens and OAuth2.
- Configure roles and permissions inside Keycloak.
- Protect different API endpoints based on user roles.
Integrating Keycloak with Spring Boot provides a powerful and flexible way to manage authentication and authorization for your applications. Whether for internal tools or production-grade microservices, this setup can easily scale to meet your security needs.
Source code: https://github.com/fmarchioni/mastertheboss/tree/master/spring/keycloak
Recommended Articles
Connect Your Node.js App to Keycloak Using the Adapter - A Comprehensive Guide
Learn how to securely connect your Node.js app to Keycloak for authentication and authorization. Includes setup steps and example code.
Enable Two-Factor Authentication (2FA) with Keycloak Using Java
Learn how to integrate 2FA in Keycloak's standard authentication flow for enhanced security. #Keycloak #Java #Authentication #Security
Install Keycloak Client Adapters on WildFly for Enhanced Authentication/Authorization
Learn how to install Keycloak Client Adapters on WildFly 21 for seamless authentication/authorization management. #Keycloak #WildFly #Java
Keycloak Tutorial: Setting Up and Configuring WildFly with the Latest Stable Build
Learn how to set up and configure Keycloak for an Enterprise application running on WildFly. Includes steps for downloading, starting, and configuring a Keycloak Realm.