How to Migrate VMs to OpenShift Virtualization with MTV and Ansible
In this article, we will learn how to migrate existing Virtual Machines from VMware vSphere, Red Hat Virtualization (RHV) and OpenStack to OpenShift Virtualization. We will cover the Migration Toolkit for Virtualization (MTV), its integration with Red Hat Ansible Automation Platform (AAP), and how to choose between the two approaches.
If you are new to the platform, start with What is OpenShift Virtualization?
Prerequisites
- An OpenShift cluster with the OpenShift Virtualization Operator installed.
- The Migration Toolkit for Virtualization Operator, installed from OperatorHub into the
openshift-mtvnamespace. - API access and credentials for the source platform: the vCenter SDK URL, the RHV Manager REST API, or the OpenStack endpoint.
- The
ocandvirtctlcommand-line tools. - For the automated approach: an Ansible Automation Platform Controller with the
redhat.openshiftcollection.
Why Migrate VMs to OpenShift Virtualization
Moving VMs to OpenShift Virtualization is not just a hypervisor swap. You run VMs and containers on the same Kubernetes cluster, with a single management stack. The main advantages are:
- Unified infrastructure: no separate hardware pools, hypervisor licenses or virtualization management stacks.
- Same tooling for all workloads: the OpenShift Web Console,
ocandvirtctl. VMs and containers share RBAC, theetcdstore, networking objects, StorageClasses and the Prometheus/Grafana monitoring stack. - No refactoring required: applications that cannot be containerized, such as Microsoft Windows workloads or software with custom kernel requirements, run as-is. They sit on the same software-defined network as your containerized microservices.
- Standard virtualization features: live migration, high availability, node scheduling, snapshots, power management and thin provisioning.
Migrating VMs with the Migration Toolkit for Virtualization
MTV is an Operator based on the upstream Forklift project. It imports VMs into OpenShift Virtualization at scale, through a guided and automated workflow.
Supported source providers
MTV connects to the following source platforms:
- VMware vSphere: vCenter or unmanaged ESXi hosts.
- Open Virtual Appliance (OVA) files exported from VMware.
- Red Hat Virtualization (RHV / oVirt).
- OpenStack.
- Remote OpenShift Virtualization clusters.
MTV Custom Resources
MTV drives the whole migration through five Custom Resources. They build on each other in this order:
Provider: stores the API endpoint and credentials of a platform. You need one for the source hypervisor (for example, the vCenter SDK URL or the RHV Manager REST API) and one for the target OpenShift cluster.NetworkMap: maps each source network to a target network in OpenShift. The target can be the default Pod Network or a secondary network created with Multus CNI.StorageMap: maps source datastores or storage domains to OpenShift StorageClasses, for example Ceph RBD block storage from OpenShift Data Foundation.Plan: the migration blueprint. It references the source provider, the target namespace, the list of VMs, and theNetworkMapandStorageMapto use.Migration: runs aPlanand tracks its progress through the stagesInitialize,DiskAllocation,ImageConversion,DiskTransferV2vandVirtualMachineCreation.
Note that for vSphere providers you should supply a custom VMware Virtual Disk Development Kit (VDDK) container image. It speeds up disk transfers significantly.
To learn how StorageClasses and PVCs work in OpenShift, see Configuring persistent storage on OpenShift.
The validation service
Before transferring any data, MTV validates the configuration of each source VM. Potential risks show up as Concerns in the plan. Typical concerns are:
- Memory ballooning or Kernel Samepage Merging (KSM) enabled on the source VM.
- Affinity placement policies that require live migration and shared
RWXstorage. - Unsupported vNIC network filters or the SPICE display protocol.
Migrating VMs using the Migration Toolkit
The following diagram shows an overview of the steps you can complete from the Web Console to perform a migration of a VM from another provider into OpenShift Virtualization using the Migration Toolkit.
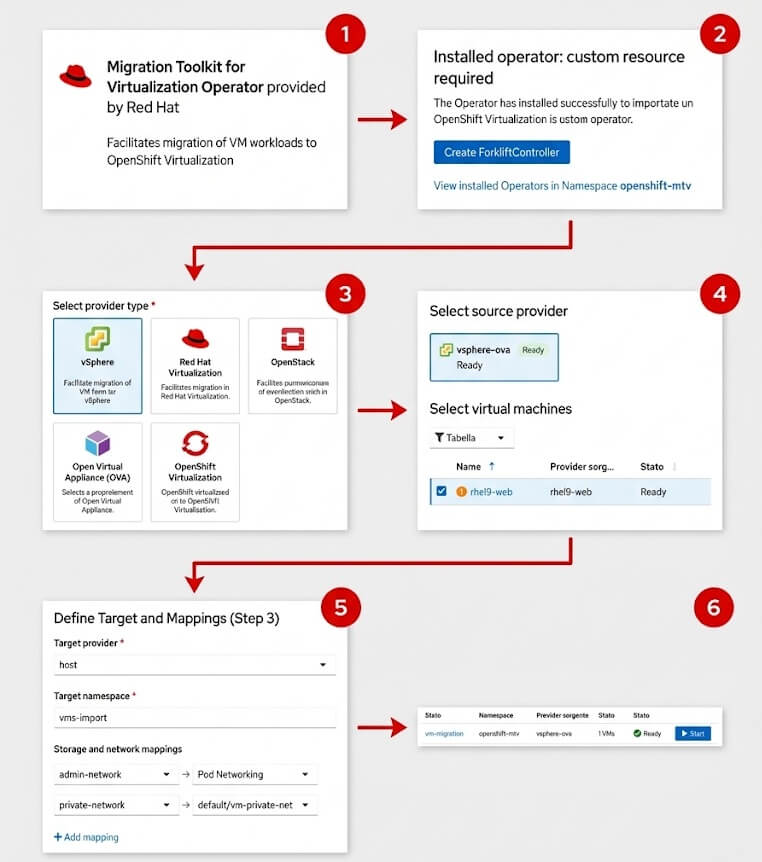
- Step 1: Install the Operator. Go to OperatorHub in the OpenShift web console, search for "mtv", and install the Migration Toolkit for Virtualization Operator.
- Step 2: Create the Controller. Once the operator is successfully installed, click Create ForkliftController to generate the required custom resource using the default values.
- Step 3: Add a Source Provider. Navigate to the "Providers for virtualization" page, click Create Provider, and select the appropriate provider type for your environment (e.g., Open Virtual Appliance (OVA)).
- Step 4: Select the Virtual Machine. Create a new migration plan by selecting your newly created source provider (e.g.,
vsphere-ova), and check the box next to the specific VM you want to migrate (e.g.,rhel9-web). - Step 5: Define Target and Mappings. Configure the target provider and namespace, then map the source network and storage interfaces to the appropriate OpenShift Virtualization resources.
- Step 6: Start the Migration. Once the migration plan is created and its status shows as "Ready" in the dashboard, click the Start button to begin importing the VM.
Cold migration vs. warm migration
MTV supports two migration strategies. Pick one based on how much downtime the workload can tolerate.
Cold migration is the default. MTV powers off the source VM, copies its disks to a Persistent Volume Claim (PVC) on OpenShift, then boots the new VM on OpenShift Virtualization.
Warm migration reduces downtime with a two-stage process:
- Precopy: MTV copies disk data in the background while the source VM keeps running. It uses Changed Block Tracking (CBT) snapshots, so the source VM needs
ctkEnabled=TRUE. - Cutover: MTV shuts down the source VM, copies the remaining changed blocks, and powers on the VM in OpenShift Virtualization. You can trigger the cutover manually from the Web Console or schedule it in advance.
Importer pods, conversion pods and cleanup
During the transfer, MTV starts one of two pod types:
- An importer pod, which copies the raw disk images directly.
- A conversion pod, which runs
virt-v2vto inject the required KVM device drivers into the guest root disk.
Once the migration succeeds, archive the migration plan. This removes the temporary pods and intermediate PVCs. The NetworkMap and StorageMap definitions are kept, so you can reuse them in the next plan.
After the migration, you manage the imported VMs like any other VM. See How to Create a VM on OpenShift Virtualization for the lifecycle and console commands.
Migrating VMs with Ansible Automation Platform
MTV moves disks between hypervisors. A real migration campaign also needs work before and after the transfer, inside the guest and across the network. Ansible Automation Platform handles this orchestration on top of MTV.
What Ansible adds to the migration
Ansible playbooks cover the tasks that surround the hypervisor migration:
- OS and driver compatibility: adjust kernel parameters, update BIOS/firmware settings, install guest drivers and packages.
- Network reconfiguration: change guest IP addresses, update DNS records, routing tables and firewall policies, before or after the cutover.
- Storage: manage snapshots, format guest file systems and expand disk volumes at OS level.
- Verification and rollback: run pre-migration checks, post-migration smoke tests (for example,
curlagainst a web endpoint or amysqlquery), and rollback workflows if a migration fails.
How Ansible drives MTV
Instead of using the Web Console, the playbook creates the MTV Custom Resources through the redhat.openshift collection. A typical flow has four phases:
- Discovery: query the source hypervisor API with collections such as
ovirt.ovirtorvmware.vmware. Build the VM inventory and check for migration concerns. - Resource provisioning: create the
Secret,Provider,NetworkMapandStorageMapin theopenshift-mtvnamespace. - Plan execution: create the
Planwith the target VM IDs, then apply aMigrationto start the transfer. - Post-migration tasks: when the
Migrationstatus reachesSucceeded, connect to the new VM or to external endpoints and verify that the services are available.
AAP Controller configuration
To run migration campaigns from the Ansible Automation Platform Controller, configure the following objects:
- Inventories: run the playbooks against
localhost. The playbook talks to the OpenShift and hypervisor REST APIs with bearer tokens, so no agent is needed on the source hosts. - Credentials: store the OpenShift API bearer token, the Git SCM access keys and the source hypervisor logins (vCenter or RHV Manager).
- Execution Environments: container images that bundle the required collections, such as
redhat.openshift,ovirt.ovirtandkubernetes.core. - Job Templates: link the playbooks from Git and expose variables such as
vm_nameandtarget_nsthrough surveys. Application owners can then run self-service migrations.
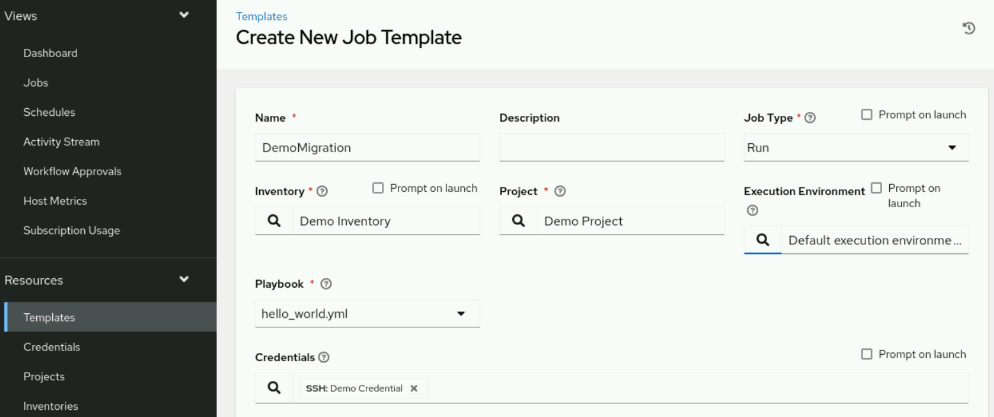
When running thr Ansible Automation Controller, a Job Template defines the playbook, inventory, and credentials required to launch Ansible jobs that interact with a hypervisor and create objects in OpenShift.
MTV Web Console or Ansible: Which One to Use
Both approaches use MTV to move the disks. The difference is how much of the surrounding process you automate. The following table summarizes the trade-offs:
| Scenario | MTV Web Console | AAP + MTV |
|---|---|---|
| Migration volume | Small to medium | Large, mass migrations |
| Required skills | Web Console | Ansible and YAML |
| Guest OS / IP changes | Manual | Automated |
| Pre/post verification | Manual | Automated |
| External tool integration | None | CI/CD, ITSM, GitOps |
Use the MTV Web Console when
- You migrate a few dozen VMs and administrators can monitor progress interactively.
- You want a visual wizard that suggests storage and network mappings, with no code to write.
- The VMs keep their IP addresses, hostnames and network settings, for example on secondary Multus networks.
- You don't have Ansible Automation Platform deployed and want to start migrating right away.
Use Ansible Automation Platform with MTV when
- You migrate hundreds or thousands of VMs across several business units and maintenance windows.
- The VMs need IP address changes, new DNS entries, firewall updates or guest software updates during cutover.
- You need to plug migrations into existing CI/CD, ITSM ticketing or GitOps workflows.
- You need self-service surveys for application owners, with role-based access, job scheduling and centralized audit logs.
Conclusion
In this article, we covered how to migrate VMs to OpenShift Virtualization with the Migration Toolkit for Virtualization, from its Custom Resources to cold and warm migrations. We also saw how Ansible Automation Platform orchestrates MTV for large-scale, end-to-end migration campaigns.
For further details, check the official Migration Toolkit for Virtualization documentation.
Recommended Articles
Getting started with OpenShift Virtualization - A Comprehensive Guide
Learn how OpenShift Virtualization integrates traditional VMs with Kubernetes for seamless management. #OpenShift #Kubernetes #Virtualization
Comparing Red Hat OpenShift Virtualization vs VMware vSphere: A Guide for Enterprise Workloads
Learn how to decide which workloads should move to OpenShift Virtualization and which should stay with VMware vSphere. #OpenShift #vSphere #Virtualization
Create and Manage Virtual Machines on OpenShift Virtualization
Learn how to create and manage Virtual Machines on OpenShift Virtualization using templates and instance types. #OpenShiftVirtualization #KubeVirt #Virtualization #Java #Middleware #CloudNative
Set Up Red Hat OpenShift Local on Your Laptop for Cloud Native Development
Learn how to set up an OpenShift cluster using Red Hat OpenShift Local on your laptop. Includes Linux installation steps and Pull Secret download.