Getting started with Stork Service Discovery on Quarkus
Learn how to implement service discovery and client-side load balancing in Quarkus 3.x using SmallRye Stork and HashiCorp Consul. This guide covers setting up remote services, registering endpoints asynchronously using Mutiny and Vert.x, and invoking them dynamically with Quarkus REST Client Reactive and Jakarta EE 10.
In modern microservices architectures, services have dynamically assigned locations. Therefore, it’s essential to integrate Service Discovery as part of the picture. In this article you will learn how to leverage Service Discovery using the SmallRye Stork framework on top of a Quarkus 3.x reactive application.
Service discovery in a nutshell
Before we dig into this tutorial, we need to define some terms, which will help you to understand the context, especially if you are new to this technology.
- Service Discovery: it is a mechanism to register and find services so that a microservice is able to locate all available services dynamically.
- SmallRye Stork is a Service Discovery and client-side load-balancing framework that can work either as a standalone Java application or integrated with Quarkus.
- Consul: it is a service networking solution that enables a set of services across any cloud or runtime environment (automating network configurations, discovering services, securing connectivity).
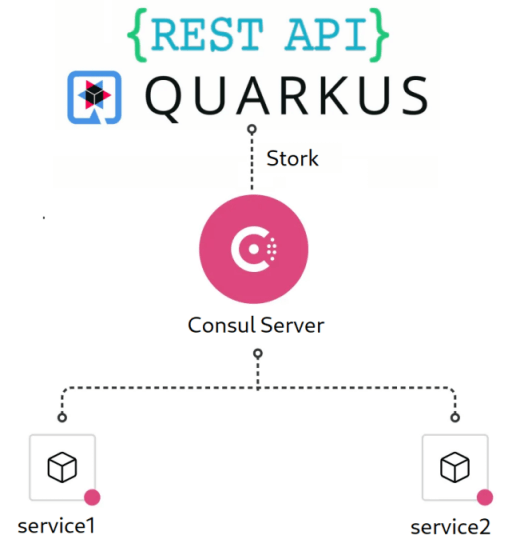
Let’s see with a practical example how you can discover an external service registered on a Consul network server using SmallRye Stork and a Quarkus REST Client interface.
Coding the remote services
Firstly, we will define two remote services. You can use any HTTP Server for this purpose. In this article, we will do that with a cool JBang application named httpd that fires off an HTTP Server in just one line. ( To learn more about JBang project, visit the home page or read this intro article: JBang: Create Java scripts like a pro ).
Before starting the application, create a home page for both services under the folders “service1” and “service2”:
mkdir service1
mkdir service2

echo "Hello Service 1" > service1/index.html
echo "Hello Service 2" > service2/index.html
Our Web server is ready to go! Launch JBang httpd application passing as argument the port (8090) and the Root folder for service1:
$ jbang httpd@jbangdev -p 8090 -d service1

Serving HTTP on 0.0.0.0 port 8090 (http://0.0.0.0:8090/) from /home/quarkus/stork-demo/service1 ...
Next, repeat the same step for service2:
$ jbang httpd@jbangdev -p 8091 -d service2

Serving HTTP on 0.0.0.0 port 8091 (http://0.0.0.0:8091/) from /home/quarkus/stork-demo/service2 ...
Your two Web servers are running. Cool isn’t it? Now let’s move to our Quarkus application.
Coding the Quarkus application
To bootstrap our Quarkus 3.x application, we will be using the Quarkus CLI. Let’s create the application stork-demo:
quarkus create app stork-demoOur application requires both libraries from the Quarkus project and SmallRye Stork integration. Add the extensions using Quarkus CLI:
quarkus ext add resteasy-reactive resteasy-reactive-qute rest-client-reactive smallrye-stork stork-service-discovery-consulNext, include the Vert.x Mutiny Consul Client plus test dependencies if needed.
Here is how your dependencies in the pom.xml should look for Quarkus 3.x:
<dependencies>
	<dependency>
		<groupId>io.quarkus</groupId>
		<artifactId>quarkus-resteasy-reactive-qute</artifactId>
	</dependency>
	<dependency>
		<groupId>io.quarkus</groupId>
		<artifactId>quarkus-rest-client-reactive</artifactId>
	</dependency>
	<dependency>
		<groupId>io.quarkus</groupId>
		<artifactId>quarkus-smallrye-stork</artifactId>
	</dependency>
	<dependency>
		<groupId>io.smallrye.stork</groupId>
		<artifactId>stork-service-discovery-consul</artifactId>
	</dependency>
	<dependency>
		<groupId>io.smallrye.reactive</groupId>
		<artifactId>smallrye-mutiny-vertx-consul-client</artifactId>
	</dependency>
	<dependency>
		<groupId>io.quarkus</groupId>
		<artifactId>quarkus-arc</artifactId>
	</dependency>
	<dependency>
		<groupId>io.quarkus</groupId>
		<artifactId>quarkus-resteasy-reactive</artifactId>
	</dependency>
<!-- Test dependencies -->
	<dependency>
		<groupId>io.quarkus</groupId>
		<artifactId>quarkus-junit5</artifactId>
		<scope>test</scope>
	</dependency>
	<dependency>
		<groupId>io.rest-assured</groupId>
		<artifactId>rest-assured</artifactId>
		<scope>test</scope>
	</dependency>
	<dependency>
		<groupId>org.testcontainers</groupId>
		<artifactId>testcontainers</artifactId>
		<scope>test</scope>
	</dependency>
</dependencies>
The first thing we will code is a CDI bean which will register our service instances on Consul upon startup. Note that in Quarkus 3.x, standard annotations use the jakarta.* namespace instead of legacy javax.*.
We will define a service name which can dynamically resolve to a set of instances, each with a unique ID:
- Service name: http-service with the following Service instances:
- service1: running on port 8090
- service2: running on port 8091
To instantiate the service eagerly, we will add the registration within a Jakarta CDI Bean using Mutiny reactive extensions:
package org.acme.services;

import io.quarkus.runtime.StartupEvent;
import io.vertx.ext.consul.ConsulClientOptions;
import io.vertx.ext.consul.ServiceOptions;
import io.vertx.mutiny.core.Vertx;
import io.vertx.mutiny.ext.consul.ConsulClient;
import jakarta.enterprise.context.ApplicationScoped;
import jakarta.enterprise.event.Observes;
import org.eclipse.microprofile.config.inject.ConfigProperty;

@ApplicationScoped
public class Registration {

    @ConfigProperty(name = "consul.host") String host;
    @ConfigProperty(name = "consul.port") int port;

    @ConfigProperty(name = "service1", defaultValue = "8090") int portService1;
    @ConfigProperty(name = "service2", defaultValue = "8091") int portService2;

    public void init(@Observes StartupEvent ev, Vertx vertx) {
        ConsulClient client = ConsulClient.create(vertx, new ConsulClientOptions().setHost(host).setPort(port));

        client.registerService(
                new ServiceOptions().setPort(portService1).setAddress("localhost").setName("http-service").setId("service1"))
                .await().indefinitely();

        client.registerService(
                new ServiceOptions().setPort(portService2).setAddress("localhost").setName("http-service").setId("service2"))
                .await().indefinitely();
    }
}
We will define the Consul host, port, and Stork resolution rules in the application.properties file:
consul.host=localhost
consul.port=8500

stork.http-service.service-discovery.type=consul
stork.http-service.service-discovery.consul-host=localhost
stork.http-service.service-discovery.consul-port=8500
stork.http-service.load-balancer.type=round-robin
As you can see, in the second part of the configuration we define service-specific properties. Stork seamlessly handles host lookup via Consul and uses a round-robin load-balancing algorithm across available healthy instances.
The Rest Client Façade
To make our remote services accessible, we define a REST Client interface using standard Jakarta REST annotations and MicroProfile REST Client annotations:
package org.acme;

import jakarta.ws.rs.GET;
import jakarta.ws.rs.Produces;
import jakarta.ws.rs.core.MediaType;
import org.eclipse.microprofile.rest.client.inject.RegisterRestClient;

@RegisterRestClient(baseUri = "stork://http-service")
public interface GreetingService {

    @GET
    @Produces(MediaType.TEXT_PLAIN)
    String get();
}
Notice the baseUri scheme: stork://http-service tells Quarkus to delegate endpoint selection and load balancing to SmallRye Stork.
The last piece of the puzzle is the Front-end API resource class which your clients invoke:
package org.acme;

import io.quarkus.qute.Template;
import io.quarkus.qute.TemplateInstance;
import jakarta.inject.Inject;
import jakarta.ws.rs.GET;
import jakarta.ws.rs.Path;
import jakarta.ws.rs.Produces;
import jakarta.ws.rs.core.MediaType;
import org.eclipse.microprofile.rest.client.inject.RestClient;

@Path("/api")
public class FrontendApi {

    @Inject
    @RestClient
    GreetingService service;

    @Inject
    Template api;

    @GET
    @Produces(MediaType.TEXT_HTML)
    public TemplateInstance invoke() {
        return api.data("greeting", service.get());
    }
}
The invoke method will call our GreetingService, which in turn goes through Stork to locate an active service instance. In this example, we return a Qute Template so you can view the output rendered in HTML. (Learn more about Qute Templates here: Qute: a template for Quarkus Web applications ).
Plain REST Services?
Note: If your REST application needs to return raw text without an HTML template, you can write the endpoint as follows:
@GET
@Produces(MediaType.TEXT_PLAIN)
public String invoke() {
    return service.get();
}
Finally, the api.html template page prints the value stored under the key “greeting”:
<!DOCTYPE html>
<html>
<head>
<meta charset="UTF-8">
</head>
<body>
<h2>Quarkus Stork demo</h2>

    <p>Greeting from Service:  {greeting}</p>

</body>
</html>
Here’s the project structure layout:
src
├── main
│   ├── java
│   │   └── org
│   │       └── acme
│   │           ├── FrontendApi.java
│   │           ├── GreetingService.java
│   │           └── services
│   │               └── Registration.java
│   └── resources
│       ├── application.properties
│       ├── META-INF
│       │   └── resources
│       │       └── index.html
│       └── templates
│           └── api.html
└── test
Running the application
To connect to Consul, start a Consul container using Docker or Podman:
docker run \
    -d \
    -p 8500:8500 \
    -p 8600:8600/udp \
    consul agent -server -ui -node=server-1 -bootstrap-expect=1 -client=0.0.0.0
Now, launch your Quarkus application in development mode:
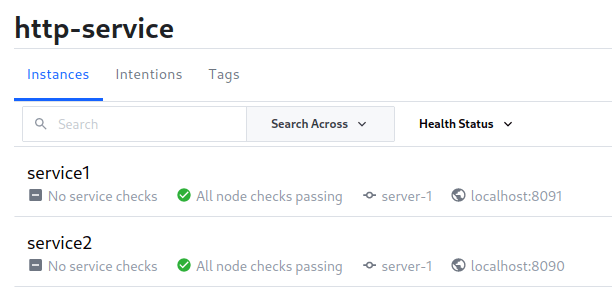
mvn quarkus:devIf you connect to the Consul Web Console (http://localhost:8500), you will see that http-service has two registered instances:
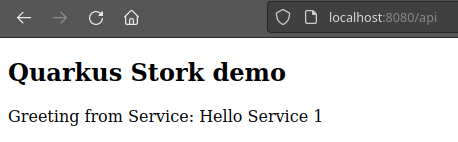
Next, issue a GET request to the REST /api endpoint:
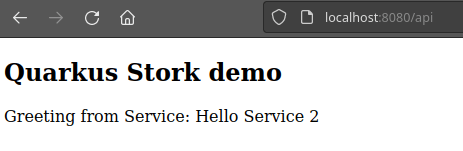
Requesting the /api endpoint again will trigger Stork's client-side round-robin load balancer, seamlessly directing the call to service 2:
Source code:
You can find the source code for this tutorial at: https://github.com/fmarchioni/mastertheboss/tree/master/quarkus/stork-demo
Frequently Asked Questions (FAQs)
How does Quarkus 3.x handle service discovery with SmallRye Stork?
SmallRye Stork acts as a framework for dynamic service discovery and client-side load balancing. Instead of hardcoding target URLs, microservices use custom URIs (e.g., stork://http-service). Stork dynamically resolves active service instances using backends like Consul, Kubernetes, Eureka, or static configuration.
What updates were required for Quarkus 3.x migration?
Quarkus 3.x migrated fully to Jakarta EE 10, requiring namespace updates from javax.* to jakarta.* (e.g., jakarta.ws.rs.*, jakarta.enterprise.context.*, jakarta.inject.*). Additionally, reactive APIs leverage Mutiny 2.x and updated Vert.x clients.
Can SmallRye Stork support other load-balancing mechanisms besides round-robin?
Yes. Stork supports multiple load-balancing algorithms out of the box, including Round-Robin, Random, and Least Requests. You can also implement custom Stork load balancers by extending Stork's SPI classes and defining them in your configuration.
Recommended Articles
Create a Quarkus Reactive Application with SmallRye Reactive Messaging and Mutiny for Kafka
Learn how to stream data from/to a Kafka cluster using Quarkus, SmallRye Reactive Messaging, and Mutiny. #Quarkus #ReactiveJava #Kafka
Second Tutorial on Messaging with Quarkus and MicroProfile Reactive Messaging
Explore reactive messaging in Quarkus applications using SmallRye Reactive Messaging API. Learn about Message, Incoming, Outgoing annotations and protocol support.
Integrate PrimeFaces in Quarkus Applications with Jakarta EE 10
Learn how to integrate PrimeFaces library into Quarkus applications for Jakarta EE 10 environments.
A Comprehensive Comparison of WildFly Application Server and Quarkus Framework in Enterprise Java
Explore the features and use cases of WildFly and Quarkus for robust Java applications. #WildFly #Quarkus #EnterpriseJava