How to Use Keycloak REST API
The Keycloak REST API is a Web service Endpoint that allows you to manage Keycloak using a REST channel. It provides endpoints for creating, updating, and deleting Keycloak entities such as users, groups, clients, roles, and realms. You can use any programming language that supports HTTP requests to interact with the API.
Pre-requisite: If you are new to Keycloak, we recommend checking this article for a quick heads up about Keycloak Identity Manager: Keycloak tutorial for beginners
Getting Started with Keycloak Admin API
For the purpose of getting started, you can just kick-off Keycloak using the Docker Image:
docker run --rm --name keycloak_dev -p 8080:8080 \
    -e KC_BOOTSTRAP_ADMIN_USERNAME=admin -e KC_BOOTSTRAP_ADMIN_PASSWORD=admin \
    quay.io/keycloak/keycloak:latest \
    start-dev
Note that, since Keycloak 26, the bootstrap variables are KC_BOOTSTRAP_ADMIN_USERNAME and KC_BOOTSTRAP_ADMIN_PASSWORD; the older KEYCLOAK_ADMIN / KEYCLOAK_ADMIN_PASSWORD variables have been removed. If you need a refresher on running Keycloak in Docker, see our dedicated guide: Keycloak with Docker and Docker Compose.
Then, to run the REST API we need to use the Keycloak Admin CLI which is a Client interface to Keycloak resources. You can find it under the Client section of your Realms under the name "admin-cli":
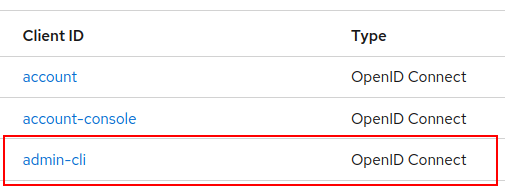
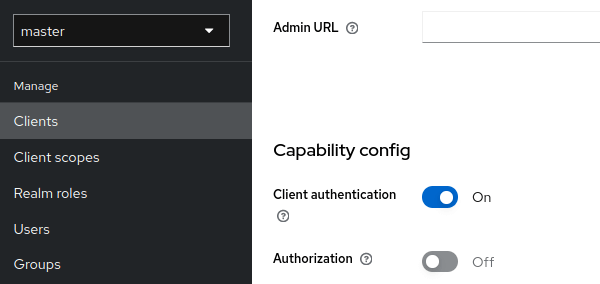
By using the admin-cli Client you can access and manage Keycloak using the language neutral REST API. Before accessing the admin-cli Client, enable Client Authentication in the main Client settings:
Then, take note of the Credentials for the admin-cli Client:
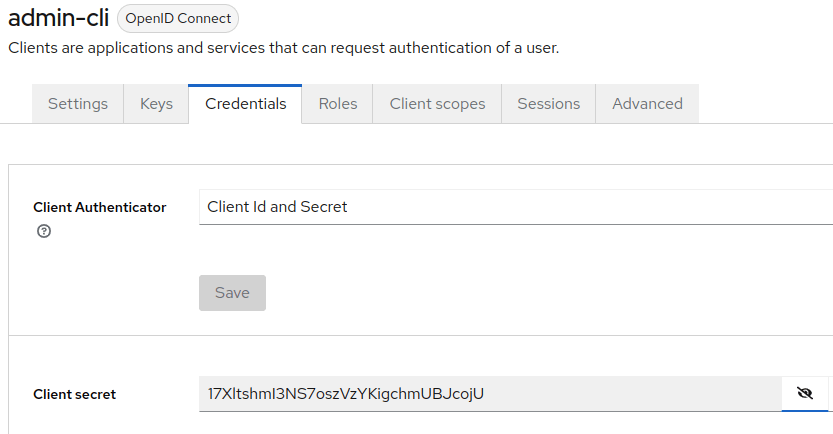
Then, we will collect a JWT token using the Admin credentials and the admin-cli credentials. The JWT token by default will expire in 1 minute so, for the purpose of this tutorial, we recommend extending the Access Token Lifespan from the Realm settings:

Next, let's fetch a JWT token with the following bash command:
export access_token=$(curl --insecure -X POST http://localhost:8080/realms/master/protocol/openid-connect/token \
    --user admin-cli:17XltshmI3NS7oszVzYKigchmUBJcojU \
    -H 'content-type: application/x-www-form-urlencoded' \
    -d 'username=admin&password=admin&grant_type=password' | jq --raw-output '.access_token')
Finally, verify that the access_token variable contains the actual Token for the Administrator user:
echo $access_token
eyJhbGciOiJSUzI1NiIsInR5cCIgOiAiSldUIiwia2lkIiA6ICJIeTZ1OFV6aFk2aVpuRXhSTUJ1QkRmb3V3WnZRaGNHYnJYSC0xb0tZbDJVIn0.eyJleHAiOjE2Nzg0NjM4MjQsImlhdCI6MTY3ODQ2MzIyNCwianRpIjoiMTRlOTEwYWYtMTg5YS00YTczLThiYzUtMzE1NzczZDI1ZDhkIiwiaXNzIjoiaHR0cDovL2xvY2FsaG9zdDo4MDgwL3JlYWxtcy9tYXN0ZXIiLCJzdWIiOiJkNGM3NDIyZC0yZDIzLTQzNjQtOGJjNi05Mjk4MTY3MzhiZmMiLCJ0eXAiOiJCZWFyZXIiLCJhenAiOiJhZG1pbi1jbGkiLCJzZXNzaW9uX3N0YXRlIjoiNmJkNzg4N2ItNzZiYi00Yjc3LWJhYmYtOGM5NmNhMTY5ZGU2IiwiYWNyIjoiMSIsInNjb3BlIjoicHJvZmlsZSBlbWFpbCIsInNpZCI6IjZiZDc4ODdiLTc2YmItNGI3Ny1iYWJmLThjOTZjYTE2OWRlNiIsImVtYWlsX3ZlcmlmaWVkIjpmYWxzZSwicHJlZmVycmVkX3VzZXJuYW1lIjoiYWRtaW4ifQ.bCOKTedsTjeQvCNUj-YQgIuB4P6LIxnnSoj4M2M1VKPXwegP5aust2r8k2JqHpT63DkYaGJGbqzqzu36lpCgXGJQ7TjPJ5MvL1Zs2POJwE6V2E7HD86uJwPiKhT7nbS4KAkz5bR3iOsTh0QbeeNO7IhD0qxmof6SmeKCkSrzRGw1oldo_9lYP_16plyjNtoBTM4nIf0QREOVe_Jto0utaVpe996YINIDkQu8HNmFp43C_URGKIEqP4MlWpImYu-hr5vr-ol-q_lGaAJ6ov0-uzta7BK5Sj8KkQbCWQIMaoroaEy7QZBqNYViTpxyQoCEtv_bUmlLNVmqG8f1h7OKMQ
The password grant is fine for this tutorial, but avoid it in production
The flow above uses the Resource Owner Password Credentials grant (grant_type=password) with your personal admin username/password. This is convenient for a quick local tutorial, but the OAuth 2.0 Security Best Current Practice explicitly discourages this grant, and it also means embedding a real admin's password in a script. For automation, CI/CD pipelines, or any long-running integration, create a dedicated confidential Client with Service Accounts enabled, assign it the realm-admin role (or a narrower custom role) from the realm-management client, and obtain a token with the client_credentials grant instead:
export access_token=$(curl --insecure -X POST http://localhost:8080/realms/master/protocol/openid-connect/token \
    -H 'content-type: application/x-www-form-urlencoded' \
    -d 'client_id=my-automation-client' \
    -d 'client_secret=my-automation-client-secret' \
    -d 'grant_type=client_credentials' | jq --raw-output '.access_token')
This avoids storing personal admin credentials anywhere, and the service account's permissions can be scoped down independently of the human admin account.
Managing Keycloak Realm
Once that you have the Admin Token, we will start managing our Keycloak server. Firstly, we will create another Realm where we will create some Users.
The main reference for Keycloak Admin API is available at: https://www.keycloak.org/docs-api/26.7.0/rest-api/index.html — update the version number in the URL to match the Keycloak release you are running, since the REST API reference is versioned per release.
To create a new Realm, we need to run a POST to Keycloak Admin URL (http://localhost:8080/admin/realms) with a JSON Body which contains the Realm Name. For example:
curl -X POST -k -g -H "Authorization: Bearer $access_token" \
    "http://localhost:8080/admin/realms" \
    -H "Content-Type: application/json" \
    --data '{
        "id": "testrealm",
        "realm": "testrealm",
        "accessTokenLifespan": 600,
        "enabled": true,
        "sslRequired": "all",
        "bruteForceProtected": true,
        "loginTheme": "keycloak",
        "eventsEnabled": false,
        "adminEventsEnabled": false
    }'
Notice that we need to include in the Authorization: Bearer Header the Token that we have copied into the $access_token variable.
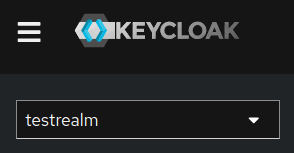
You can check on the Keycloak console that your Server now includes the Realm "testrealm":
Next, we will add a User to the Realm. The API to add a new User you can execute a POST http://localhost:8080/admin/realms/<realm>/users with a JSON Payload which contains details about the User.
For example, the following curl command will create the user "frank":
curl -k -X POST http://localhost:8080/admin/realms/testrealm/users \
    -H "Content-Type: application/json" \
    -H "Authorization: Bearer $access_token" \
    --data '{
        "username": "frank",
        "enabled": true,
        "realmRoles": ["user", "offline_access"],
        "attributes": {
            "uid": ["4010"],
            "homedir": ["/home/frank"],
            "shell": ["/sbin/nologin"]
        }
    }'
Next, verify on the Console that the user is available in the Realm:
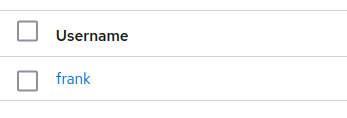
To list Users in your testrealm you can run a GET http://localhost:8080/admin/realms/<realm>/users as follows:
curl -k -X GET http://localhost:8080/admin/realms/testrealm/users \
    -H "Authorization: Bearer $access_token" | jq
The above REST API returns the following JSON output:
{
    "id": "d0375203-631f-4c32-8fad-bc4482be3c29",
    "createdTimestamp": 1678462584187,
    "username": "frank",
    "enabled": true,
    "totp": false,
    "emailVerified": false,
    "attributes": {
        "uid": [
            "4010"
        ],
        "shell": [
            "/sbin/nologin"
        ],
        "homedir": [
            "/home/frank"
        ]
    },
    "disableableCredentialTypes": [],
    "requiredActions": [],
    "notBefore": 0,
    "access": {
        "manageGroupMembership": true,
        "view": true,
        "mapRoles": true,
        "impersonate": true,
        "manage": true
    }
}
Then, let's try another command, to modify the password for the user "frank". The command is PUT http://localhost:8080/admin/realms/<realm>/users/<user-id>/reset-password:
curl -k -X PUT http://localhost:8080/admin/realms/testrealm/users/d0375203-631f-4c32-8fad-bc4482be3c29/reset-password \
    -H "Content-Type: application/json" \
    -H "Authorization: Bearer $access_token" \
    --data '{
        "type": "password",
        "temporary": false,
        "value": "my-new-password"
    }'
Finally, the command to delete a user is DELETE http://localhost:8080/admin/realms/<realm>/users/<userid>. In our example:
curl -k -X DELETE http://localhost:8080/admin/realms/testrealm/users/d0375203-631f-4c32-8fad-bc4482be3c29 \
    -H "Content-Type: application/json" \
    -H "Authorization: Bearer $access_token"
Production Readiness, Automation and Kubernetes/OpenShift
Once you move beyond local experimentation, a few practices keep REST API-driven Keycloak automation safe and reliable in production:
- Never use
curl -k/--insecurein production. The flag disables TLS certificate validation and is only acceptable for local testing against a self-signed certificate. Point your CA-signed certificate's trust chain instead, or import the CA into your client's trust store. - Prefer the client_credentials grant with a dedicated service-account client (as shown above) over the password grant for any script, pipeline, or backend integration, and scope its realm-management roles as narrowly as the task requires (e.g.
manage-usersrather than the fullrealm-adminrole). - Rotate client secrets and short-lived tokens the same way you would rotate any other credential, and store them in a secrets manager or Kubernetes Secret rather than in plaintext scripts or CI variables.
- Automate realm/user/client provisioning declaratively using tools built for it — for example the Keycloak Operator's
KeycloakRealmImportcustom resource on Kubernetes/OpenShift, or Infrastructure-as-Code tools like the Keycloak Terraform provider — rather than large ad-hoc curl scripts, once your automation needs grow beyond a handful of calls. - Watch API rate limits and brute-force protection: repeated failed admin REST calls can trigger Keycloak's brute-force detection on the account making the calls, which is one more reason to use a dedicated service account rather than a shared human admin login for automation.
Conclusion
The Keycloak REST Admin API is a handy option to manage Keycloak using any interface or language that supports HTTP requests to interact with the API. For quick local tasks the password-grant flow shown here gets you productive in minutes; for anything running unattended or in production, switch to a dedicated service account client with the client_credentials grant, and consider a declarative provisioning tool once your automation grows beyond a few scripted calls.
Frequently Asked Questions
What replaced KEYCLOAK_ADMIN and KEYCLOAK_ADMIN_PASSWORD in the Docker image?
Since Keycloak 26, use KC_BOOTSTRAP_ADMIN_USERNAME and KC_BOOTSTRAP_ADMIN_PASSWORD. These only create the initial admin user on first startup and have no effect once an admin account already exists in the database.
Why does my access token expire so quickly?
By default, Keycloak's access tokens have a short lifespan (often around 1 minute) for security reasons. For scripting and tutorials you can temporarily raise the Access Token Lifespan in Realm Settings, but for production automation it's better to simply re-request a token (or use a refresh token / re-authenticate with client_credentials) whenever a call fails with a 401, rather than permanently extending token lifetimes realm-wide.
Should I use the password grant or client_credentials for REST API automation?
Use client_credentials with a dedicated service-account-enabled confidential client for any non-interactive automation. The password grant (Resource Owner Password Credentials) is discouraged by the OAuth 2.0 Security Best Current Practice and requires embedding real user credentials in scripts, which is both a security and an operational liability.
Why do my curl commands need the -k/--insecure flag?
It's only needed because the tutorial's local Keycloak instance uses a self-signed certificate (or plain HTTP in dev mode). In production, your Keycloak instance should have a valid CA-signed certificate, and you should remove -k/--insecure so TLS verification is properly enforced end-to-end.
How do I find the correct Admin REST API documentation for my Keycloak version?
The official reference is versioned at https://www.keycloak.org/docs-api/<version>/rest-api/index.html — replace <version> with the exact Keycloak version you're running (for example 26.7.0), since endpoint parameters and payloads can change between major/minor releases.
Can I manage Clients, Groups, and Roles with the same REST API pattern shown for Users?
Yes. Clients, Groups, Roles, Realms, and most other Keycloak entities follow the same REST convention (POST to create, GET to list/read, PUT to update, DELETE to remove) under /admin/realms/<realm>/..., all authenticated with the same Bearer token pattern shown in this article.
Is there a better way to provision realms and users than scripting curl calls?
For anything beyond a handful of one-off calls, yes — consider the Keycloak Operator's KeycloakRealmImport custom resource on Kubernetes/OpenShift, or the community Keycloak Terraform provider, both of which let you describe realms, clients, and roles declaratively and keep them under version control instead of maintaining imperative curl scripts.
Recommended Articles
Securing a MicroProfile Application with Keycloak 26.0.0
Learn how to secure your MicroProfile application running with Thorntail runtime and Keycloak, including setting up realms, roles, users, and client policies.
Mastering Keycloak's Embedded H2 Database: Deleting an User
Learn how to access and manage Keycloak's embedded H2 database for common tasks like deleting a user. #Keycloak #H2Database #Java #CloudNative
Effortlessly Import & Export Keycloak Realms Using Quarkus - A Step-by-Step Guide
Learn how to export and import Keycloak realms using Quarkus, including exporting users with a simple command line script. #Keycloak #Quarkus #Java #CloudNative
Run Keycloak 26 with Docker: Step-by-Step Tutorial
Learn how to deploy Keycloak 26 using Docker and Docker Compose. Includes development mode, data persistence, and PostgreSQL production setup.