How to Create a VM on OpenShift Virtualization
In this tutorial, we will show how to create and manage Virtual Machines on OpenShift Virtualization. We will cover both the OpenShift Web Console (templates and instance types) and the command line, using oc and virtctl.
OpenShift Virtualization is built on the KubeVirt project and manages VMs as native Kubernetes objects. For an overview of its architecture, see What is OpenShift Virtualization?
Prerequisites
- An OpenShift cluster with the OpenShift Virtualization Operator and the
HyperConvergedresource installed. - The
ocandvirtctlcommand-line tools installed on your workstation. - A project to host the VM. The CLI examples use
my-project. - An SSH key pair. The CLI examples use
~/.ssh/lab_rsaand~/.ssh/lab_rsa.pub. - A boot source in the
openshift-virtualization-os-imagesnamespace. The CLI examples userhel9-mariadb.
Creating a VM from the Web Console Catalog
The Web Console provides a Catalog to provision VMs. Log into the OpenShift Web Console, switch to the Virtualization perspective from the top-left dropdown, and select Catalog.
From the Catalog you can launch a VM using two abstractions: Templates and Instance Types.
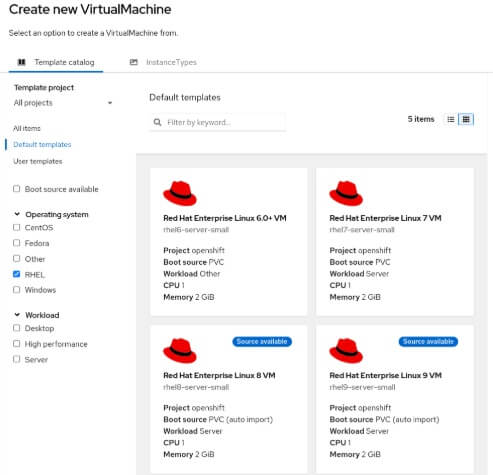
Option 1: Using a VM Template
A template provides a complete configuration for a specific operating system. Red Hat supplies templates for Red Hat Enterprise Linux (RHEL), CentOS Stream, Fedora, Windows 10/11 and Windows Server.
When you provision a VM from a template, you can set the following options:
- Workload profile: Server is the default and targets general server workloads. Desktop favors higher VM density on the host over peak performance for each VM.
- Boot source: start from an existing
DataVolume, clone a Persistent Volume Claim (PVC), or upload a local disk image. When cloning, OpenShift creates aDataVolumein your project and populates the target PVC. - Customization: templates ship default CPU and memory values that you can change before deployment. You can also edit network interfaces, disks and SSH keys.
Option 2: Using Instance Types
Instance Types give you fixed resource sizes, similar to public cloud providers. OpenShift Virtualization includes cluster-wide instance types, called common-instancetypes, which define exact CPU and memory allocations.
The predefined instance types come in the following series:
| Series | Name | Use case |
|---|---|---|
cx1 |
Compute Exclusive | Dedicated CPU threads for compute-intensive workloads. |
m1 |
Memory Intensive | Higher RAM-to-CPU ratio for memory-heavy applications. |
n1 |
Network Intensive | Optimized for DPDK and Virtual Network Functions (VNFs). |
o1 |
Overcommitted | High VM density for development and test. CPU and memory are shared on a best-effort basis. |
u1 |
Universal | General purpose. Physical CPU cores are time-sliced among VMs. For example, u1.small is 1 CPU / 2 GiB RAM and u1.medium is 1 CPU / 4 GiB RAM. |
Note that you cannot override the CPU and RAM values of an instance type. To change compute capacity, pick a different size or series.
You can still customize the non-compute attributes: disks, secondary network interfaces, public SSH keys and cloud-init scripts.
Bootable Volumes and Preferences
With Instance Types, OpenShift pairs the instance type with two more resources:
- Bootable Volumes: sealed golden disk images stored in the
openshift-virtualization-os-imagesnamespace. - Virtual Machine Cluster Preferences (VMCP): recommended guest OS settings, such as
virtiofor disk buses and network interfaces.
Managing the VM from the Web Console
Navigate to Virtualization > VirtualMachines to list the VMs in the active project. Each VM shows its status: Running, Stopped, Starting or Stopping.
VM details tabs
Click a VM to open its details page. The page has the following tabs:
- Overview: runtime status, assigned node, backing
virt-launcherPod, CPU/memory usage and a live console preview. - Configuration: view and edit the VM settings, grouped in sub-menus:
- Details: hostname, CPU/memory sizing and guest OS details.
- Storage and Network: hot-plug or attach extra disks and network interfaces.
- SSH and Initial Run: public SSH keys, key injection settings, and cloud-init or sysprep scripts.
- Console: graphical and text access to the guest from the browser.
- Metrics, Events, Snapshots and Diagnostics: performance tracking, cluster events, disk snapshots and condition statuses for troubleshooting.
Power actions and Live Migration
The action menu on the VM details page controls the VM lifecycle:
- Start, Stop, Restart and Pause. Stopping a VM deletes its
VirtualMachineInstance(VMI) and thevirt-launcherPod. TheVirtualMachinedefinition and its persistent storage remain intact. - Migration: starts a Live Migration, which moves the running VM to another worker node without downtime.
Console access
The Console tab offers three viewers:
- VNC Console: the default viewer. It provides graphical and text access to the guest OS. Utility buttons let you copy the guest login credentials, paste text, and send key combinations such as
Ctrl+Alt+Delete. - Serial Console: connects to the VM's virtual serial port for text-only administration.
- RDP Console: generates a Remote Desktop Protocol session file for Windows VMs. It requires the QEMU guest agent running in the guest OS.
Creating a VM from the Command Line
OpenShift Virtualization registers its custom resources under the kubevirt.io API group. The main resource is VirtualMachine, which you can define in YAML and apply with oc.
Generating the VM manifest with virtctl
Instead of writing the YAML by hand, you can generate it with virtctl create vm. The following command creates a manifest for a VM named rhel9-database:
virtctl create vm --name rhel9-database \
  --namespace my-project \
  --memory 5Gi \
  --volume-import type:ds,src:openshift-virtualization-os-images/rhel9-mariadb \
  --user developer \
  --password-file developer-password \
  --ssh-key "$(cat ~/.ssh/lab_rsa.pub)" > rhel9-database.yaml
The resulting VirtualMachine manifest contains:
- A
DataVolumesourced from therhel9-mariadbgolden image. - The
developeruser credentials and the SSH public key, injected through cloud-init (cloudInitNoCloud).
Applying the manifest
Now, create the VM by applying the manifest:
oc apply -f rhel9-database.yamlSince the manifest is plain YAML, you can keep it in version control and deploy it through your GitOps pipeline.
Managing the VM Lifecycle from the Command Line
Use virtctl to control the VM power state.
Start the VM:
virtctl start rhel9-databaseStop the VM:
virtctl stop rhel9-databaseRestart the VM:
virtctl restart rhel9-databaseTo inspect the VM, use oc. The vms resource lists the VirtualMachine definitions. The vmis resource lists the running VirtualMachineInstance objects:
# List VirtualMachine definitions in the current namespace
oc get vms

# List running VirtualMachineInstance objects across all namespaces
oc get vmis -A

# Inspect the VM details
oc describe vm rhel9-database
Finally, to delete the VM:
oc delete vm rhel9-databaseFor more oc commands, see our OpenShift cheatsheet.
Accessing the VM from the Command Line
virtctl connects to running VMs through the cluster, so you don't need to expose them externally.
Serial console
Connect to the interactive serial prompt:
virtctl console rhel9-databaseTo exit the serial console session, press Ctrl + ].
VNC session
Launch a local VNC viewer window:
virtctl vnc rhel9-databaseSSH
Connect over SSH with your private key. This works without a public IP or external route, as long as the VM has an SSH key configured:
virtctl ssh --username developer -i ~/.ssh/lab_rsa rhel9-databasePort forwarding
Forward local port 22080 to port 80 of the VM:
virtctl port-forward vm/rhel9-database 22080:80Note that port forwarding tunnels traffic through the Kubernetes API server. Use it for local development, web UI checks or database administration, but not for heavy production traffic or large data transfers.
Conclusion
In this tutorial, we created VMs on OpenShift Virtualization from the Web Console Catalog, using templates and instance types. We also generated a VirtualMachine manifest with virtctl, and managed and accessed the VM from the command line.
For further details, check the official Red Hat OpenShift Virtualization documentation.
Recommended Articles
Getting started with OpenShift Virtualization - A Comprehensive Guide
Learn how OpenShift Virtualization integrates traditional VMs with Kubernetes for seamless management. #OpenShift #Kubernetes #Virtualization
Learn How to Use Templates on OpenShift with CakePHP Framework - Step-by-Step Tutorial
Mastering OpenShift templates for deploying a simple CakePHP application using MySQL and PHP images. Learn step-by-step from downloading the GitHub repository to creating resources.
Build and Deploy a Jakarta EE Application on OpenShift: A Step-by-Step Guide
Learn how to deploy a Jakarta EE application on OpenShift, including installing Code Ready Containers and setting up the environment.
Deploying a Java EE Application on WildFly with OpenShift Container Platform
Learn how to deploy a Java EE application on WildFly using OpenShift Container Platform, including creating a project and customizing the database.