JUnit 5 : Step-by-step Tutorial
JUnit 5 is the industry-standard testing framework for modern Java applications, featuring a modular architecture comprising the JUnit Jupiter API, Vintage engine, and JUnit Platform. Whether you are writing unit tests on Java 17/21 LTS or leveraging parameterized testing to eliminate boilerplate code, JUnit 5 delivers clean syntax and powerful execution control. This step-by-step tutorial guides you through setting up a modern JUnit 5 project with Maven, Gradle, and popular Java IDEs.
Setting up a JUnit 5 project
Firstly, we will add a simple Calculator Class that contains a method to sum two int values:
public class Calculator {

    public int add(int a, int b) {
        return a + b;
    }

}
Next, you’ll want to create a new class file in your test directory. Typically you can name this Class after the class you want to test with the Test suffix. Therefore, add the following CalculatorTest Class:
package com.example.project;

import static org.junit.jupiter.api.Assertions.assertEquals;

import org.junit.jupiter.api.DisplayName;
import org.junit.jupiter.api.Test;
import org.junit.jupiter.params.ParameterizedTest;
import org.junit.jupiter.params.provider.CsvSource;

class CalculatorTests {

    @Test
    @DisplayName("1 + 1 = 2")
    void addTwoNumbers() {
        Calculator calculator = new Calculator();
        assertEquals(2, calculator.add(1, 1), "1 + 1 should equal 2");
    }

    @ParameterizedTest(name = "{0} + {1} = {2}")
    @CsvSource({
            "0,    1,   1",
            "1,    2,   3",
            "49,  51, 100",
            "1,  100, 101"
    })
    void addParams(int first, int second, int expectedResult) {
        Calculator calculator = new Calculator();
        assertEquals(expectedResult, calculator.add(first, second),
                () -> first + " + " + second + " should equal " + expectedResult);
    }
}
To run a JUnit Test, we need to decorate our methods with the @org.junit.jupiter.api.Test annotation.
- The method addtwoNumbers tests a sum of two Integers. It uses the @DisplayName annotation to declare a custom display name for the test method.
- The method addParams is a @ParameterizedTest . Parameterized tests make it possible to run the same test multiple times with different arguments.
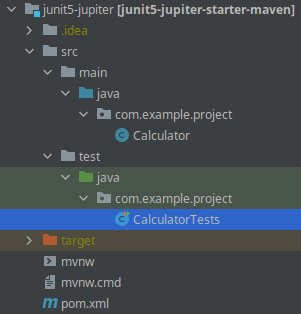
After adding the Test Class, check that your Project has the following structure:
Building JUnit 5 applications
Bext, we will configure the pom.xml to build the JUnit 5 project. For this purpose, you should include the following dependencies in your pom.xml:
<dependencyManagement>
    <dependencies>
        <dependency>
            <groupId>org.junit</groupId>
            <artifactId>junit-bom</artifactId>
            <version>6.1.0-RC1</version>
            <type>pom</type>
            <scope>import</scope>
        </dependency>
    </dependencies>
</dependencyManagement>

<dependencies>
    <dependency>
        <groupId>org.junit.jupiter</groupId>
        <artifactId>junit-jupiter</artifactId>
        <scope>test</scope>
    </dependency>
</dependencies>
At the time of writing (May 2026) the latest version of JUnit Jupiter is 6.1.0-RC1.
On the other hand, Gradle users can use the following build.gradle:
plugins {
    id 'java'
    id 'eclipse' // optional (to generate Eclipse project files)
    id 'idea' // optional (to generate IntelliJ IDEA project files)
}

repositories {
    mavenCentral()
}

dependencies {
    testImplementation(platform('org.junit:junit-bom:5.7.2'))
    testImplementation('org.junit.jupiter:junit-jupiter')
}

test {
    useJUnitPlatform()
    testLogging {
        events "passed", "skipped", "failed"
    }
}
Finally, run the above test from the Command Line or from your IDE:
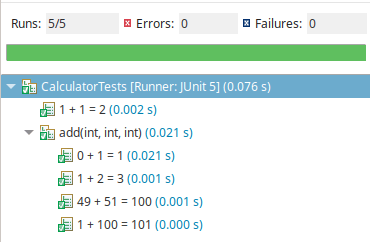
As you can see, all assertion were verified so test passed. Also notice that the first Test contains the @DisplayName attribute from our method (“1 + 1 = 2”).
The source code for this tutorial is available here: https://github.com/fmarchioni/mastertheboss/tree/master/test/junit5-jupiter
Summary:
- JUnit is a framework which supports several annotations to identify a method which contains a test.
- JUnit provides an annotation called @Test, which tells the JUnit that the public void method in which it is used can run as a test case.
- JUnit can be easily be plugged in your IDE: check this tutorial as an example: Getting started with JUnit and IntelliJ Idea
Frequently Asked Questions
Do JUnit 5 test classes and methods need to be public?
No. Unlike JUnit 4, JUnit 5 Jupiter test classes and test methods can be package-private, which improves encapsulation.
How do I migrate legacy JUnit 4 tests to JUnit 5?
Include the org.junit.vintage:junit-vintage-engine dependency in your build configuration to run legacy JUnit 4 tests alongside modern JUnit 5 Jupiter tests on the same platform.
Recommended Articles
Beginner's Guide to Setting Up Cucumber for Java: A Comprehensive Tutorial
Learn how to set up and write your first Cucumber test in Java. Discover features and scenarios with our step-by-step guide.
Enhance Your Test Readability with JUnit 5's @DisplayName Annotation
Learn how to customize test names in JUnit 5 using the @DisplayName annotation for better readability and maintainability. #JUnit5 #JavaTesting #CloudNativeDevOps
Create a JUnit 5 Project with IntelliJ IDEA - Step-by-Step Guide
Learn how to create a simple JUnit 5 project using IntelliJ IDEA. Follow our step-by-step guide to set up your Maven project, add a basic class and test it using JUnit.
JUnit 5: Comprehensive Guide to Asserting Exceptions in Tests
Learn how to assert exceptions in JUnit 5 and JUnit4 tests with examples. #JUnit #JavaTesting #CloudNative